Many of us have access to the Internet, and most of us have more than one device in our home that can potentially connect to Internet resources. Computer, phone, tablet, laptop, organizer - all of this can be used to surf the global network. But on the same phone it is somewhat difficult and expensive to use the traffic offered by the mobile operator. And buying a router just for one device, you see, is unprofitable. However, there are quite simple and convenient alternative connection options, which are discussed below.
Internet distribution via Wi-Fi without a router
Imagine that you have a laptop or computer with a Wi-Fi adapter that is connected to the Internet. And you want to make it an access point to the global network for other devices. First of all, you need to disable your antivirus firewall or Windows Firewall. If you do not do this, then distributing the Internet from your computer will not work, no matter how much you manipulate the connection settings. It is also worth remembering that in order to distribute Internet traffic, the computer or laptop must be turned on.
To disable the Windows Firewall, do the following:
- Open the control panel. In the Windows search (magnifying glass icon next to “Start”), enter control and select the “Control Panel” item in the search results.
Through Windows search, find and open “Control Panel”
- Click on the item “Windows Firewall” or “Windows Defender Firewall” depending on the version of the system you have installed.
Open the Windows Defender Firewall panel
- Click the link “Turn Windows Defender Firewall on or off.”
- Check the “Disable…” checkboxes and confirm the changes by clicking OK.
Disable the firewall and save changes
Switch the view to small or large icons.
The “Control Panel” contains operating system controls
After this, you can safely begin creating a wireless connection.
It is possible that your computer's firewall function has been taken over by the antivirus program's firewall. In this case, you will have to disable it too. Moreover, it is a firewall, and not protection against viruses and malware. Do not weaken your computer's security under any circumstances.
Via command line
One of the easiest ways to create a virtual connection is to use the command line (CL). It is very convenient because you set the connection parameters yourself and can turn the network on or off at any time.

These manipulations complete the creation and activation of the Wi-Fi virtual network. Now we have a working virtual network that we can already connect to, and we also have permission to transfer data over it. However, access to the Internet is not yet available; it needs to be opened. For this:
- Open the “Control Panel” and select the “Network and Sharing Center” item.
"Network and Sharing Center" is one of the main computer management tools
- You will see a list of networks to which you are connected. Select the one that provides your computer with access to the Internet, and click the button next to the word “Connections:”.
The Network and Sharing Center shows a list of your computer's network connections and information about each of them.
- In the window that opens, click on the “Properties” button.
Select “Properties” to configure the network connection
- Go to the “Access” or Sharing tab. Select the network you created, most likely it will be called “Wireless Connection” (Local Area Connection) with a number at the end. We check the boxes allowing users of this network to access the Internet. Confirm the changes with the OK button.
Opening access to the Internet from the selected network
- After this, your Wi-Fi network can be detected by any device within a radius of 10 meters, and you can enter it if you know the password.
There is a small drawback to using this method: after each reboot of the computer, the virtual network must be turned on again, which is not very convenient. But you can create a basic auxiliary interface.

As a result, we have command files for starting and stopping the virtual network, which greatly simplifies working with it.
Video: how to set up Internet distribution via Wi-Fi from a laptop using the command line
Using third party programs
Craftsmen have long been renowned for their ability to create products that are significantly more convenient than standard Microsoft processes. Distributing the Internet without a router is just one of the areas that amateur programmers have chosen. Let's take a look at some of the popular utilities they've written.
MyPublicWiFi
The MyPublicWiFi program is perhaps the most basic. The process of working with it is very simple: you launch it, click the Set up and Start Hotspot button, and the program itself creates a virtual network. You can change some data, for example, the network name or password (choose something different from the standard ones).
MyPublicWiFi automatically creates a virtual network
WIFI Hotspot Creator
Another representative of the class of programs for distributing the Internet through the creation of a virtual network is WIFI Hotspot Creator.
WIFI Hotspot Creator also creates a virtual network with the click of a button
This utility works in a similar way: with one click it creates a virtual network. The only difference from the previous program is that you need to manually select the connection that will supply Internet traffic. Then press the Start button and a Wi-Fi connection will appear, ready to use.
Programs that work on the principle of MyPublicWiFi and WIFI Hotspot Creator only create a virtual network. You need to disable the firewall and allow Internet distribution, as described in the instructions above, yourself.
Internet distribution via USB to a smartphone with Android OS
Thanks to the capabilities of Android, you can very quickly distribute the Internet to your smartphone via a USB cable. You don't need any additional software or any drivers for this. Although a little preparatory work is, of course, necessary.
- First, connect your smartphone with a USB cable to your computer, then open the settings in it, scroll down and select the “For Developers” item.
In the settings, select “For Developers”
- In the menu that opens, check the box next to “USB Debugging”. Now you can connect your phone to your computer.
Enable “USB Debugging”
- Then we return to the settings and click on the “Advanced” item. Depending on the OS version, the item may also be called “More...”. The main thing is that it is next on the list after “Data Transfer”.
Select "Advanced" or "More..."
- Check the box next to “USB Internet”. At this point, the preparatory work with the smartphone is completed, and you can proceed to the PC settings.
We create a local network with a computer by enabling the “USB Internet” function
- Open TsUSiOD. Most likely, you already have an additional local network in addition to the one you had before. Click on “Change adapter settings” (the button in the left column).
Click on the item “Change adapter settings”
- Right-click on the connection that has access to the Internet and select “Properties”.
Open the Internet connection properties
- Go to the “Access” tab, select “Local Area Connection*11” or something similar that you have created, and check the “Allow...” checkboxes. Save the changes with the OK button.
In the access settings, we allow local network access to the Internet
- Next, open the properties of the network that connects the computer and phone.
Open the properties of the local connection
- We open the same fourth Internet protocol and change the checkboxes to manual address settings.
- We enter the following data:
- IP address: 192.168.137.5 (the last cell can be filled with any number other than 1);
- subnet mask: 255.255.255.0;
- default gateway: 192.168.137.1;
- preferred DNS server: 8.8.8.8;
- alternative DNS server: 8.8.4.4.
- We check the correctness of the entered data and save the changes with the OK button.
In the window that opens, select “IP version 4 (TCP/IPv4)” and click “Properties”.
Open the settings of the protocol “IP version 4 (TCP/IPv4)”
Change the IP address from 192.168.137.1 to 192.168.0.1 and save the changes. The Internet on the phone will work after this.
It is possible to create a local network between computers and distribute the Internet within it if one of the computers is connected to the Internet. The disadvantage of this method is that if you have two PCs, then one of them must have two network cards, and this is not always convenient. If you have cable Internet and a laptop, then it is very difficult to distribute the Internet over a local network: you will need to buy additional adapters or hubs, since a laptop always only has one network card.
Setting up a computer that distributes the Internet
When you connect two computers with a network cable, a local network will automatically be created between them. We immediately go to “Change network adapter settings”, as in the example above. In the same way, we allow access to the Internet for the newly created local network, not forgetting to first disable the firewall.

By these actions, we set the network parameters to ensure the possibility of transmitting Internet traffic packets within it.
Setting up connections on receiving computers
Receiving computers must be configured in an almost identical manner.
Now the network between the two computers is configured: all addresses match each other, and Internet traffic packets are transmitted.
Video: how to distribute the Internet over a local network
Pros and cons of distributing the Internet without a router
Each user, without the use of additional equipment, can turn his computer into a real hub and create a network of several computers through a chain of local connections. The advantages of this approach are obvious: you don’t need to spend money on extra devices, buy one or more routers, and you can simply connect computers to one another.
But it also has disadvantages. You can distribute the Internet only within one network, and it’s good if it’s Wi-Fi: you can connect several devices to it at once. And if this is a local network, then you can distribute the Internet to only one computer at a time. If you distribute the Internet in a chain, then each computer must have two network cards. For the sake of uninterrupted access to the Internet from the last computer in the chain, the entire series of devices must operate in constant mode. That is, in some cases, routerless distribution can be very inconvenient to use.
At the same time, using a Wi-Fi router frees you from such inconveniences. Even the weakest routers cover a much larger distribution area than standard laptops, as well as a minimum of four cells for local connection.
At the same time, access via the local network is more reliable and faster. Their disadvantage is the lack of mobility: in the case of a phone, you are limited by the length of a standard USB cable (using an extension cord will affect the speed), and with a network cable you can get confused, and in most cases it has very fragile plugs. Of course, in the case of a PC this is not a problem, but if the second device is a mobile phone or a laptop traveling throughout the house, then there will be inconvenience. Internet transmission over a local network is practically unlimited in speed: the average speed of an Ethernet cable is 100 Mbit/s, a USB cable depends on the manufacturer, the minimum is 10 Mbit/s.
Distributing the Internet from a computer to other devices is quite simple. The main thing is to follow the instructions, and then you will be able to enjoy all the delights of the Internet not on one computer, but on several devices at once.
You don't have to buy a router to have WiFi in your home. A laptop connected to an Ethernet cable can also distribute the Internet throughout an apartment. There are plenty of instructions on the Internet on how to do this on Windows 7 and older, but if you have XP, do not rush to completely reinstall the operating system.
Laptop as a router on an old OS
On any operating system from Microsoft, Internet distribution via WiFi can be organized using both built-in tools and third-party utilities. But why clutter your hard drive with unnecessary programs? On Windows XP, follow these steps step by step:
- Open “Start” and go to “My Computer”.
- In the left pane, select “Network Places”.
- Next, go to the “Show network connections” section.
- Right-click on the “Wireless Connections” shortcut and open “Properties”.

- Next, go to “Wireless Networks” - “Advanced”.
- Here, select the “Computer to Computer” option and confirm your choice.
- Click “Add” and enter the details of the network to be created (name, password, encryption method) and confirm.
- Next, open the “General” tab and highlight the IPv4 item, click on the “Properties” button.
- In this window, set the indicator to “Use the following IP...” and enter the following data:
IP - 192.168.1.1
Subnet mask - 255.255.255.0
The distribution has been created, all that remains is to enable the ability to connect to it from other devices within the range of the wireless network. To do this, return to the network connections window and right-click on the local connection and open its properties. You need to put an indicator next to the “Allow other network users...” item.

Now WiFi distribution should be fully functional.
Settings on the current OS
Similar actions can be done with Windows 7. In order for Wi-Fi to be distributed from a computer or laptop, you can, as in the previous example, step by step create a new virtual network. The only difference is in some steps.
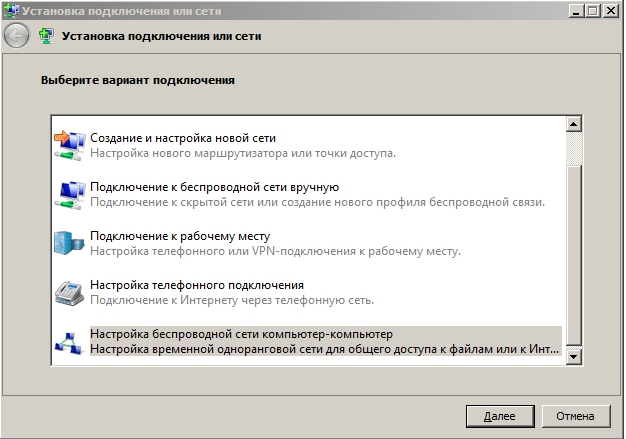
- You need to look at the “Network and Sharing Center”.
- Run “Set up a new connection...”.

- Then go to “Setting up a wireless network “Computer-Computer” and click the “Next” button.
As you can see, the actions are similar. In the new window, enter the network name, encryption type and password. Save the changes and click “Next”. Here all that remains is to apply the “Enable sharing...” setting.

But that is not all. To be able to connect to WiFi from other devices, return to the “Network and Sharing Center” and on the left side of the window, find the line “Change advanced settings...”.

After opening this menu, make active the items highlighted in the screenshot:

Ready! But Windows 7 offers another, more advanced and simpler way to organize WiFi distribution from a computer or laptop equipped with a wireless adapter. This is using the command line. Find it in the list of all Windows programs and open it with administrator rights (right-click on the shortcut and select the appropriate item).
In the window that opens, enter a command of this type:
netsh wlan set hostednetwork mode=allow ssid=”new network name (at least 8 characters)” key=”password”
and press Enter. This is a quick way to create a distribution, and to start distributing the Internet from your laptop, use the command:
netsh wlan start hostednetwork
All that remains is to go to the “Network Control Center...” - Properties of the Local connection (the same one that is the wire through which the Internet “gets” into the apartment). Open the “Access” tab and check both boxes. WiFi distribution is now working.
(Visited 21,556 times, 1 visits today)
Nowadays, many people think that life does not exist without the Internet. Therefore, in modern conditions, Wi-Fi routers are installed in public places, which provide visitors to this place with free distribution. But what if you need to do urgent work and there is no free internet nearby? How to solve this problem? Many computer users have phones that have provider packages installed that provide not only voice communications, but also the Internet. But
Methods for transferring Internet from phone to computer
There are actually only three options for Internet transmission. However, their number may be reduced depending on the technical equipment of the computer and the accessories available to enable such transfer. So,
The first method is using a cable connecting your phone and computer. In this case, there is no need for additional devices or special requirements for the computer, except for the presence of a connection cable.
The second method is to distribute the Internet from your phone using Wi-Fi. But there are some peculiarities. The phone must have a Wi-Fi distribution option, the computer must have a built-in Wi-Fi adapter, or such an adapter must exist as a separate device.

The third way is to use BlueTooth connections. The restrictions that are imposed on this method are similar to those in the previous case. The choice of how to transfer the Internet from your phone to your computer will largely depend on your preferences, as well as the technical features of the computer and phone. In the future, let's look at each of these methods separately.
Internet transmission via cable
The first thing you need to do is connect your phone to your computer using a cable. It is worth noting that some phones use the same connector for charging the battery. Therefore it is important to have USB cable for connecting your phone to a computer, which is not always included. In the future, it is necessary for the PC to identify your phone. Depending on the operating system installed on your computer and the type of phone, this operation may differ on different systems.
But the essence of this action is the same - the computer needs to provide drivers for a given phone model, thanks to which it will be able to transfer data from the phone to the computer and back. Some systems provide automatic detection of drivers in the operating system, and some cables have a disk with the appropriate software. But most often you have to look for drivers on the Internet.
After the phone has been identified, you need to perform the operations shown in the photo on it.

You need to go to your phone settings and select the “Other networks” tab. In it select "USB modem". And after that, the Internet appears on the computer almost immediately.
How to transfer Internet from phone to computer via Wi-Fi
This method of Internet distribution is the most popular and is most often used by computer users. The advantage of this method is that there are no cable connections, and there is no need to search for drivers. In addition, most modern smartphones can distribute the Internet from the phone, with the phone acting as an access point. And any modern laptop has a Wi-Fi adapter. Therefore, first the access point is turned on on the phone, and if a secure connection is planned, a password is set for it.

After this, Wi-Fi is turned on on the computer and the phone’s Wi-Fi network is detected. The computer asks for a password, after entering it the Internet is already on your computer.
Internet sharing using BlueTooth connection
Usage BlueTooth connections are not so popular among computer owners. This is due to the short range of reliable BlueTooth connections, on the one hand, and on the other hand, this type of connection is less commonly used than Wi-Fi. With this type of connection, the phone's setup is very similar to that of a modem connected via a USB cable. Only in this case, the BlueTooth modem is selected in the phone settings.
Internet distribution methods
There are three ways using which you can connect your device to the Internet available on your computer:
- using a USB cable;
- via Wi-Fi network;
- via Bluetooth connection.
Each of them has its own disadvantages that you need to be aware of, otherwise you won’t be able to connect to the Internet.
Using a USB cable
This method is not suitable for owners of devices running iOS, since iPhone and iPad can distribute the Internet via cable, but not receive it. This may be related to security. If you have an iOS device, then use one of the other two methods described below. You can distribute the Internet to devices running Android OS via a USB cable. There are two possible options here.
If you have root rights
To connect an Android device to the Internet using the system, its user must have root rights, that is, the device’s firmware must be hacked.
In this case, you will need to use the built-in settings intended for mobile application developers.
- First you need to prepare your mobile device. It must first be connected to the computer via a USB cable. Follow these steps:
Open access to developer settings - they are hidden by default to prevent the average user from breaking the system. To do this, by entering the device settings, go to the item showing information about the device.
- In the device settings, open the “System” section
Select "About phone".
- Open the “About phone” section
Scroll to the end of the information that appears. When you see the “Build Number” line, start clicking on it and click until the “Developer Options are open” notification appears. Usually 8 to 15 clicks are enough. As a result, you will have access to additional system settings.
- Click on the build number many times in a row until you see a message stating that developer settings are available
Go back to the device information, find the new “For Developer” item in it and open it.
- Select the “For Developers” section and open it
Find the item that enables USB debugging mode and set the switch opposite it to the “Enabled” position.
- Enable USB debugging mode
Go back to the main settings and open the "Advanced" section.
- Open the “Advanced” section
Check the box next to the “USB Internet” function.
Check the box next to “USB Internet”
- Done, the preparation of the mobile device is complete. Now you need to set up your computer. To do this, follow these steps:
Through the Start menu (Windows 7) or system search bar (Windows 10), find “Control Panel.” It allows you to change most operating system settings, including network settings.
- Open the "Network and Sharing Center" section. If you can't find it, use the built-in search bar.
Open the “Network and Sharing Center” section
- In the list of networks you will see two elements: a computer network with Internet access and a mobile device network that has already been created, but does not yet have the right to use the first network that has Internet access.
- Go to adapter settings.
Click the “Change adapter settings” button
- Find a network in the list that has Internet access. Right-click on it to expand the context menu and select the “Properties” function.
Open network properties in the context menu
- In the window that appears, go to the “Access” tab. Specify that other users can use this network, and select the mobile device network from the list. By this action we indicate that the network created using a USB cable with the phone has the right to exchange data with the Internet.
We indicate the network that needs to have access to the Internet
- Using the method described in step 5, open the properties of the network associated with your Android device. In the window that opens, without leaving the “Network” tab, find the IPv4 protocol and expand its properties.
Let's move on to the properties of the IPv4 protocol
- For the IP address we specify the value 192.168.0.1, and for the subnet mask - 255.255.255.0.
Enter the required IP address and network mask values
Done, save your changes and try using the Internet on your mobile device.
Without root rights
If you do not have root rights, that is, the device’s firmware is not hacked, then you do not need to obtain them to distribute the Internet via cable. There is another way - using a third-party program.
First you need to prepare your Android device. After connecting it to your computer via USB, follow steps 1–5 described in the instructions under “If you have root rights.” By doing this, you will allow the computer to change the device settings.
Further actions are performed on the computer:
- Download the Adb run application from the developer's official website. Install and run the program.
- Open the Other commands section.
- Select the Reverse tethering function.
Open the Reverse tethering item
- The program shows a list of steps that must be completed before you can distribute the Internet to your phone.
- Install the Java kit, to do this, click on step 1. It is necessary for the application to work with an Android device.
- After installing the Java kit, install the application on your device. Click on the third item, and then allow the installation of the application on the device (a corresponding notification will appear on the device display, in response to which you need to select the “Allow” option) and wait until the installation is completed.
We carry out all the steps in turn
- Done, the device has access to the Internet.
Video: distributing Internet from computer to phone
Using Wi-Fi and Bluetooth
You can distribute the Internet using both Wi-Fi technology and Bluetooth. The created network will be available for connection from devices on both Android and iOS.
But there are two important conditions:
- if you distribute a Wi-Fi network, then the computer must have a Wi-Fi adapter; in most laptops it is built-in, but only sometimes it is built into desktop computers, and if it is not there, then the system will not even show the “Search for networks” tab and Wi-Fi access settings - you will have to buy an external adapter;
- The situation is the same when distributing a network via Bluetooth: if the Bluetooth adapter is not on the computer, then you need to buy it separately (it looks like a USB flash drive).
If you have the necessary adapter, then you can proceed to creating a network to which the mobile device will connect.
What to choose: Wi-Fi or Bluetooth
If you can choose, then choose Internet distribution via Wi-Fi. This technology has several advantages:
- Much more than 7 devices can connect to the network, while for a Bluetooth network this number is the maximum;
- Transfer speeds are limited to a few hundred megabits per second, while the maximum Internet speed available over a Bluetooth network is 24 megabits per second.
Connection via system settings
This method is the simplest, but it is only available in Windows 10. If you are using an earlier version of the operating system, then use the methods described below.
To connect devices through system settings, do the following:
- Use the system search bar to find and open the Settings console.
Open the Settings window
- Open the “Network and Internet” block.
Open the “Network and Internet” section
- Enter the “Mobile Hotspot” subsection. In this section you need to select the desired method of Internet distribution: Wi-Fi or Bluetooth. If your computer is connected to the Internet through several access points, then select which connection will be distributed. Here you can change the name and password of the Wi-Fi network, which you will need to enter to gain access to it. You don't need a password to access the bluetooth network, but no more than 7 devices can connect to it at the same time.
Activating the hotspot
- After the hotspot is activated, enable searching for Wi-Fi or Bluetooth networks on your mobile device. Having seen the distributed network (it can be identified by its name), connect to it. Done, you can use the Internet.
Connecting to the distributed network
Video: Internet distribution via adapter
Connecting via the command line
This method is suitable for users of all versions of Windows. It allows you to create and configure a Wi-Fi network that you can connect to from a mobile device.
Follow these steps:

Commands for creating a local network.
Many of us now have at home not only a TV and a computer, but also a phone, tablet and other electronic devices, and there is only one Internet connection. In this regard, the following questions arise: How to distribute Wi-Fi from a computer without a router? Can a laptop distribute wifi without a router? Is it possible and how to distribute the Internet from a computer to a phone and other electronic devices? How can we distribute Wi-Fi from a computer so that we can access the Internet from all the devices we have at home? How to make Wi-Fi on a computer without a router?
Are you answering that distributing wifi from a computer/laptop is only possible thanks to a router? Then this post is for you. But is it possible to make a computer or laptop distribute Wi-Fi without a router? Can a computer distribute Wi-Fi without a router? Of course, in particular if your computer is a laptop!!!
Most likely, you know what it means to distribute wifi, so we will not describe it in detail, but will answer the questions above. So, how to distribute wifi from a computer?
How to distribute Wi-Fi from a Windows 7,8,10 computer, without a router, to any device
These tips will also come in handy for those whothe router does not distribute Wi-Fi or router stopped distributing Wi-Fi. And not everyone can set up a router, but everyone can set up a laptop using the simple instructions provided below so that your laptop starts distributingwifi It's very simple and fast. The first time setting up a laptop may take 10-15 minutes.
This method has been tested on operating systems - Windows 7, 8, 10.So, how to distribute wifi from a windows 7 computer: a laptop, and wi-fi without a router on windows 10 - for example,will not be a problem for you!This method has not been tried in other operating rooms.
If you connect using the proposed method, on another operating system, please write in the comments for the benefit of others.
It’s worth adding that in order to distribute Wi-Fi from a PC without a router, to distribute the Internet via Wi-Fi from this access point, the computer must be equipped with a Wi-Fi adapter. Either USB or PCI. In laptops this is often a built-in device. But in desktop computers this is often not the case. How to make Wi-Fi without a router on a PC, also read in the comments.
But if you have a laptop, thenunderstand: how to distribute Wi-Fi from a Windows 7, 8,10 computerYou shouldn't have any difficulties from this access point.
So, if your computer (laptop for sure) is equipped with all this, then let’s get down to business on how to distribute Wi-Fi from a computer. But to set up your computer, you still need to get an answer to this question: what do you need to download so that you have wi-fi everywhere?
How to distribute the Internet from a computer to a phone without a router?
First, we will briefly discuss what needs to be done so that you get the correct answer to the question of how to distribute wifi from a computer (laptop):
1. To distribute Wi-Fi from a computer (laptop), you need to create a virtual WI-FI point, then transfer the existing Internet connection to this access point, so you need to download free Wi-Fi. You don’t need to think about how to make Wi-Fi on your computer (laptop), a very small, free program that distributes Wi-Fi - “Mhotspot” will create an access point for you and will be responsible for it. This program does not require installation.
We share a link to download this wonderful program. You can download a Wi-Fi distribution programIt also has other interesting, useful programs; read about one of them at the end of this article.
1. So let's get started: Launch Mhotspot"and we see this aboutmhotspot program button. Let's decipher all this. Enter in the appropriate fields personal data in the field"Hotspot name"
 Enter the name of the access point (for example, Albert), this name will be seen by devices when searching for points.
3. Max Clients - here specify the number of clients that can connect to your connection point; you can connect up to 10 devices at a time. If you specify 1, then you will not be able to connect any other device to this point except the connected one.
4. Now all we have to do is click “Start Hotspot” and create an access point.
5. step, how to install Wi-Fi, it’s more complicated! Therefore, take your time and be careful.
How to distribute wifi from a computer via an existing Internet connection
First go to: Start - Control Panel - Network and Internet - Network and Sharing Center - Change adapter settings.
There you will find "Wireless network connection 2.
You can rename it to the desired name, for your convenience so as not to get confused during further configuration, for example, I renamed it to “ Virtual WiFi". But this is not necessary, you can leave itWireless network connection 2.As your heart desires.

Find your active connection. For me it is implemented through USB 3g modem, you can have any other, for example in most cases this LAN connection.
6. Now come in in your properties active connections, go to the “Access” tab. And then check all the boxes as shown on the image .

Checkboxes for “Allow other network users to use this computer’s Internet connection” and the “Allow other network users to manage Internet connection sharing” checkbox.
And on the list “Connecting your home network” select your “Virtual WiFi”your renamed or non-renamed connection.
7.
Restart your computer and then your WiFi access point will be ready and start working.Now you can always use this access point. When you connect your devices to the Internet, simply find this point in them and enter the password you specified earlier when creating the point in the Mhotspot program.
8.
If you have rebooted your laptop (computer), then to enable Internet distribution via WiFi you only need launch the “Mhotspot” program and click “Start H”
otspot
»
. You don’t need to enter anything else, because the program automatically remembers all the point name and access password you previously entered.
So, you’ve learned how to distribute Wi-Fi from your computer to your phone and other electronic devices., absolutely free.
If suddenly you are unable to connect Internet distribution using this method, or you find it difficult to understand whether it is possible to distribute Internet from your computer to your devices, try a simpler option?
Another effective method on how to distribute wifi from a computer without a router
Another even simpler way to distribute wifi from a computer without a router is the Connectify program. You don’t need to perform many manipulations in it, because the program will do almost everything for you!To connect Wi-Fi without a router and easily distribute Wi-Fi without a router using a similar and even simpler method, read another, constructive,practical article.
Afterwards, please don’t forget to write in the comments which method you liked and suited best, what difficulties you encountered and how you resolved them.
By writing about this, you may, without realizing it, help many other visitors! If you are unable to configure something, carefully study the comments and write to us.
Good luck to you friends in free swimming with Wi-Fi wifiover the Internet, without any router!Save your money, you will need it for more important things!
If you still decide to buy a good, inexpensive router at maximum speed, with Russian firmware, with a good discount and from a good seller, look and evaluate several options using the links.
How to distribute Wi-Fi from a computer - buy a router
If you couldn’t figure out how to distribute Wi-Fi from a computer without a router, then you should buy a router.
We hope you will like these routers both in price and quality:
.
Subscribe so you don't miss out on useful and proven advice from the team OPTIMUS LIFE.
Watch and read other tips .
(Visited 180 204 times, 1 visits today)
- In contact with 0
- Google+ 0
- OK 0
- Facebook 0