Hello, friends! In this article, we tried to answer many of your questions regarding RAM. ? How can I find out what RAM I have installed and how much? How to choose the right RAM for your computer. How do you know if your RAM is running in dual channel mode or not? What is better to buy, one 8GB DDR3 memory stick or two 4GB sticks each? And finally.
- If you are interested, or, also read our articles.
- Hello admin, one of my friends asks me to install more RAM. The computer properties show a capacity of 2 GB. We turned off the computer, opened the system unit, there was one stick of RAM, took it out, and there were no marks on it. Interestingly, it was not possible to determine the model of the motherboard. The computer was purchased a long time ago, so the question arose - how to find out the type of RAM it needs? After all, RAM differs in type, frequency and timing.
- Hi all! I wanted to buy additional RAM, I removed the cover of the system unit, took out the RAM stick and I can’t decipher the information written on it, the serial number is simply written there and that’s it. It is completely unclear at what frequency it operates and what type it is, DDR3 or DDR2. How to distinguish DDR3 from DDR2 memory, how do they differ in appearance?
- I have one stick of 4 GB DDR3-1600 RAM in the system unit, I want to install another stick, also 4 GB, but running at a higher frequency DDR3-1866. Will my computer work normally, and most importantly, in dual-channel mode?
My friend installed three RAM sticks of different sizes and frequencies into the system unit. Is this allowed? But what’s strange is that his computer works fine! - Tell me, how can I check if my RAM is working in dual-channel mode or not? And what conditions are needed for my memory to work in dual-channel mode. Same volume? Same frequency or same timings? How much faster does a computer run in dual-channel mode than in single-channel mode? They say that there is also a three-channel mode.
- What will work better, two sticks of 4 GB of RAM in dual-channel mode or one stick, but with a capacity of 8 GB, respectively, the memory mode will be single-channel?
To find out all the information about a RAM module, you need to carefully examine it; usually the manufacturer labels the RAM with the proper information about the frequency, volume and type of RAM. If there is no such information on the module, then you need to find out everything about the motherboard and the installed processor; sometimes this action turns into a whole investigation.
- Important Notes: Friends, do not forget that all new processors Intel Core i3, Intel Core i5, Intel Core i7 The RAM controller is located in the processor itself (previously it was controlled by the north bridge of the motherboard) and the memory modules are now directly controlled by the processor itself, the same applies to the latest AMD processors.
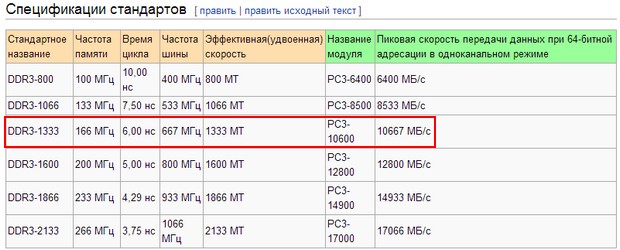
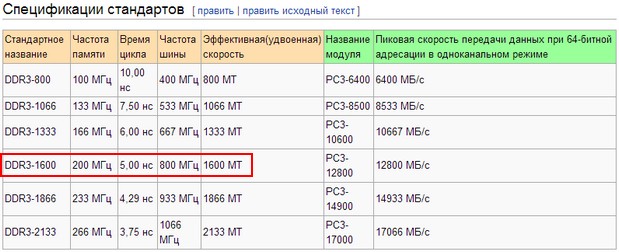
- This means that it doesn't matter what RAM frequency your motherboard supports. It is important what RAM frequency your processor supports. If your computer has a processorIntel Core i3, Intel Core i5, Intel Core i7, then the officially supported memory standards of these processors: PC3-8500 (DDR3-1066 MHz), PC3-10600 (DDR3-1333 MHz), PC3-12800 (DDR3-1600 MHz), it is at these frequencies that your RAM will operate, even if the motherboard's passport indicates that the motherboard can work with PC3-19200 (DDR3-2400 MHz) high-frequency RAM memory sticks.
- It's another matter if your processor has unlocked multiplier, that is, with the letter “K” at the end, for example CPU Intel Core i7-4770 K, 3.5 GHz. An unlocked multiplier means that in a computer with such a processor you can install memory sticks of the highest frequency, for example DDR3-1866 MHz or DDR3-2400 MHz, such a processor can be overclocked and during overclocking the RAM will operate at its frequency of 2400 MHz . If you install the RAM stick DDR3-1866 MHz or DDR3-2400 MHz into a computer with a conventional processor, that is, with locked multiplier without letter" K” at the end, for exampleIntel Core i7-3770, 3.9 GHz then such a bar will work at best at a frequency DDR3-1600 MHz, and in the worst case, the computer will not boot. Therefore, buy RAM that is suitable for your processor.
- Concerning processorsAMD recent years, then they work with memoryPC3-10600 (DDR3-1333 MHz).
Firstly, the RAM stick itself should contain all the information you are interested in, you just need to read it correctly. I don’t argue, there are memory strips that have practically nothing on them, but we can handle them too.
For example, let’s take a Hynix RAM stick, it has the following information: 4 GB PC3 – 12800.
What does the following mean:
firstly, the volume is 4 GB,
secondly, 1Rx8 - Rank - a memory area created by several or all chips of a memory module, 1Rx8 are single-sided memory ranks, and 2Rx8 are double-sided memory ranks.
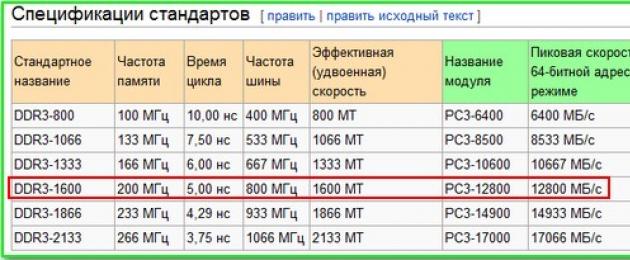
As you can see, this bar does not say that it is DDR2 or DDR3, but the throughput of PC3-12800 is indicated. PC3 is a designation for peak bandwidth belonging only to the DDR3 type (for DDR2 RAM the designation will be PC2, for example PC2-6400).
This means that our Hynix RAM stick is DDR3 and has PC3-12800 bandwidth. If the bandwidth of 12800 is divided by eight and you get 1600. That is, this DDR3 memory stick operates at a frequency of 1600 MHz.
Read everything about DDR2 and DDR3 RAM on the website
http://ru.wikipedia.org/wiki/DDR3 and everything will become clear to you.

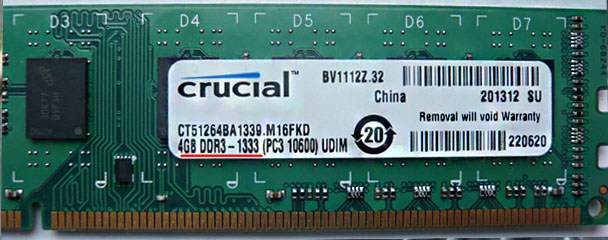
Let's take another RAM module - Crucial 4GB DDR3 1333 (PC3 - 10600). This means the following: volume 4 GB, memory type DDR3, frequency 1333 MHz, PC3-10600 bandwidth is also indicated.

Manufacturer Patriot, capacity 1 GB, PC2 bandwidth – 6400. PC2 is a designation for peak bandwidth belonging only to the DDR2 type (for DDR3 RAM the designation will be PC3, for example PC3-12800). We divide the bandwidth of 6400 by eight and get 800. That is, this DDR2 memory stick operates at a frequency of 800 MHz.

One more plank- Kingston KHX6400D2 LL/1G
Manufacturer Kingston, bandwidth 6400, type DDR2, capacity 1 GB. We divide the bandwidth by 8, we get a frequency of 800 MHz.
But this stick of RAM has more important information, its microcircuit supply voltage is non-standard: 2.0 V - set manually in the BIOS.

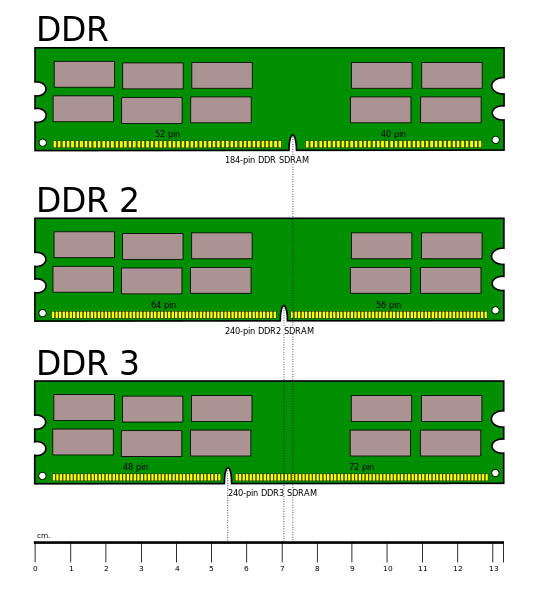
RAM modules differ in the size of the contact pads and the location of the cutouts. Using a cutout, you will not be able to install a RAM module in a slot not intended for it. For example, you cannot install a DDR3 memory stick in a DDR2 slot.
Everything is clearly visible in this diagram.
Sometimes there will be no clear information on the RAM module other than the name of the module itself. But the module cannot be removed, since it is under warranty. But by the name you can understand what kind of memory it is. For example
Kingston KHX1600 C9D3 X2K2/8G X, all this means:
KHX 1600 -> RAM operates at 1600 MHz
C9 -> Timings (Delays) 9-9-9
D3 -> RAM type DDR3
8G X -> Volume 4 GB.

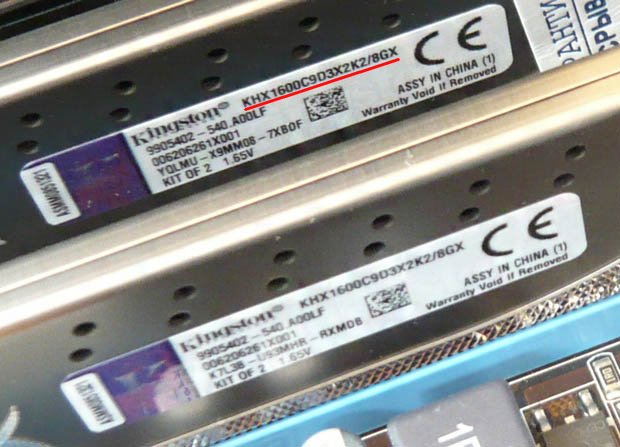
You can simply type the name of the module in search engines and you will find out all the information about it.
For example, information from the AIDA64 program about my RAM. Kingston HyperX RAM modules are installed in RAM slots 2 and 4, memory type DDR3, frequency 1600 MHz
DIMM2: Kingston HyperX KHX1600C9D3/4GX DDR3-1600 DDR3 SDRAM
DIMM4: Kingston HyperX KHX1600C9D3/4GX DDR3-1600 DDR3 SDRAM


Is it possible to install RAM sticks with different frequencies into a computer?
The RAM frequency does not have to be the same. The motherboard will set the frequency for all installed RAM sticks according to the slowest module. But I want to say that often a computer with brackets of different frequencies is unstable.
Let's do a simple experiment. For example, let's take my computer, it has two identical Kingston HyperX RAM modules, memory type DDR3, frequency 1600 MHz.
If I run the AIDA64 program on my Windows 8, it will show the following information (see the following screenshot). That is, the program AIDA64 shows simple technical characteristics of each RAM stick; in our case, both sticks have a frequency1600 MHz. But the programAIDA64 does not show at what frequency the RAM modules are currently operating; this needs to be looked at in another program called CPU-Z.

If you run the free CPU-Z program and go to the Memory tab, it will show you exactly what frequency your RAM sticks are running at. My memory operates in dual-channel Dual mode, frequency 800 MHz, since the memory is DDR3, its effective (double) speed is 1600 MHz. This means that my RAM sticks operate exactly at the frequency for which they are designed: 1600 MHz. But what will happen if, next to your RAM strips operating at a frequency 1600 MHz I will set another bar with frequency 1333 MHz!?

Let's install an additional DDR3 memory stick in my system unit, operating at a lower frequency of 1333 MHz.
Let's look at what AIDA64 shows, the program shows that an additional 4 GB stick is installed, with a frequency of 1333 MHz.
Now let’s run the CPU-Z program and see at what frequency all three sticks operate. As we can see, the frequency is 668.7 MHz, since the memory is DDR3, its effective (double) speed is 1333 MHz.

That is, the motherboard automatically set the operating frequency of all RAM sticks to the slowest module at 1333 MHz.


It is not advisable to install RAM sticks in your computer with a frequency higher than what the motherboard supports. For example, if your motherboard supports a maximum RAM frequency of 1600 MHz, and you installed a RAM module operating at a frequency of 1866 on your computer, then in the best case, this module will operate at a lower frequency of 1600 MHz, and in the worst case, the module will operate at its frequency 1866 MHz, but the computer will periodically reboot itself or you will get a blue screen when you boot the computer, in this case you will have to enter the BIOS and manually set the RAM frequency to 1600 MHz.
Timings(signal delay) determine how often the processor can access RAM. If you have a quad-core processor and it has a large second-level cache, then too long timings are not a problem, since the processor accesses RAM less often. Is it possible to install RAM sticks with different timings in a computer? The timings also do not have to match. The motherboard will automatically set timings for all modules according to the slowest module.
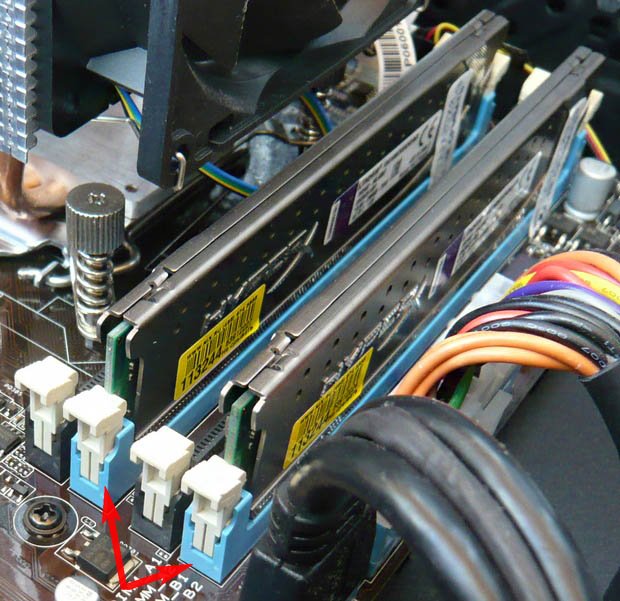
What conditions are needed for my memory to work in dual-channel mode? Before buying RAM, you need to study as much information as possible about the motherboard. All information about your motherboard can be found in the manual that came with it upon purchase. If the manual is lost, you need to go to the official website of your motherboard. You will also find the article “How to find out the model and all information about your motherboard” useful.Most often these days there are motherboards that support the RAM operating modes described below. Dual Mode (two-channel mode, most common)– if you look closely at the motherboard, you can see that the RAM slots are painted in different colors. This was done on purpose and means that the motherboard supports dual-channel RAM operation. That is, two RAM modules with the same characteristics (frequency, timings) and the same volume are specially selected and installed in RAM slots of the same color.
If your computer has one stick of RAM installed, but the motherboard supports dual-channel mode, you can buy an additional stick of RAM of exactly the same frequency and capacity and install both sticks in DIMM slots of the same color.

Is there an advantage to dual channel mode over single channel mode?
During normal work on a computer, you will not notice the difference, but when working in applications that actively use RAM, such as Adobe Premiere Pro (video editing), (Canopus) ProCoder (video encoding), Photoshop (working with images), games, the difference can be feel.
Note: Some motherboards will operate in dual-channel mode even if you install RAM modules of different sizes in the same color DIMM slots. For example, you will install a 512MB module in the first DIMM slot, and a 1GB stick in the third slot. The motherboard activates dual-channel mode for the entire volume of the first 512MB stick, and for the second stick (interestingly) also 512MB, and the remaining 512MB of the second stick will work in single-channel mode.
How do I know if my RAM is working in dual channel mode or not? Download the free CPU-Z program and go to the Memory tab, look at the Channel parameter in our case - Dual, which means the RAM operates in dual-channel mode. If the Channels parameter is Single, then the RAM operates in single-channel mode.

My opinion is that during normal work on a computer they will work the same, I personally didn’t notice much of a difference. I worked for a long time on a computer with one large stick of RAM and the performance was the same as on exactly the same computer with two sticks of RAM running in dual-channel mode. A survey of friends and acquaintances of system administrators confirmed me in this opinion. But when working with programs that actively use RAM, for example Adobe Premiere Pro, Canopus ProCoder, Photoshop, games, a computer with two sticks of RAM will work faster.

Of course it is possible, but not advisable. The computer will work more stable if it implements the RAM operating mode recommended in the motherboard data sheet. For example, two-channel mode.
In the system requirements for games or programs, the item “required RAM” is found. It is also called physical. This confuses many users.
But, if you look in more detail, its definition will not cause any difficulties.
There are many ways to find out the amount of RAM using internal operating system tools and third-party programs. Let's look at the most popular and simple ones.
You can find out the amount of RAM installed on your computer through the control panel. You can open it from the Start menu. It can open in the form of categories with sub-items or many icons.
You can change the viewing type in the upper right corner of the window. There we select the “Small icons” option and go to the “System” shortcut. A window will open for you to view basic information about your PC.

In the image, the RAM value is highlighted in green.
A faster method to open this window is to right-click on the “Computer” shortcut on the desktop and select “Properties”.
The easiest way to learn about RAM is to open
Opening the window of basic computer information using the Win+Pause key combination.
Alternative methods for viewing the amount of RAM:
- Third party programs. The most popular is CPUID CPU-Z. It has a simple interface and high functionality.
- Task Manager. The “Performance” tab will indicate the amount of physical memory.
- DxDiag information. Allows you to obtain detailed characteristics of the machine, including RAM.
Other ways How can I check the RAM on Windows 7? much more difficult to implement. Therefore, it is recommended to use those described above.
Windows Version Limitations
Different versions of Windows have limitations on the amount of RAM. 32-bit (32 bit): the Initial version supports 2 GB at the software level.
The remaining versions are 4. 64-bit (64bit): Basic and Home Basic support up to 8 GB, Home Advanced - 16, Professional and Ultimate - 192.
The capacity of your system can be seen in the same window, but in the “System Type” item.
Amount of RAM used
High load and lack of free RAM on the computer can lead to slow operation. In this case, the PC will start to slow down and become dull. The easiest way to find out the amount of free RAM is through the Task Manager.
It is called through the key combination Ctrl+Alt+Delete and selecting the appropriate position in the window that appears. You can also call it by right-clicking on the Taskbar (the bar at the bottom of the screen where the Start button is located) and selecting “Launch task manager” in the context menu that appears. In the window itself, you need to select the “Performance” tab.

The total volume is marked in black in the image. The green rectangle shows the memory occupancy percentage. The lower it is, the faster the PC will work. And its current use is highlighted in red.
Windows “eats” approximately 1 GB of RAM. The rest of the consumption comes from the programs running on the computer. It can be found in the “Processes” tab.
Increased performance
In order for your PC to function faster and not slow down, you should free up more RAM on it. To do this, you need to close all programs that are not needed.
After all, each extra browser tab consumes from 20 to 500 MB of RAM, and open programs can “eat up” much more of it.
The need to check random access memory (RAM) is dictated by the frequent occurrence of the following situations in Windows 7:
- The appearance of a “blue screen of death” (BSOD).
- Computer freezes.
- Unstable or incorrect operation of the computer.
- Critical errors when running applications.
In all such cases, the most likely culprit is the RAM, and it needs to be checked. There are several ways to test RAM in Windows 7.
Built-in Windows 7 test
Unlike previous versions of the OS, which required the use of third-party applications to analyze the performance of this computer node, the seven provides a built-in tool for this. It can be launched in two ways:
- From the command line.
- From the control panel.
To run this tool from the command line, click Start, type mdsched in the search bar, and press Enter. The following window will appear:
This window provides two options for performing the built-in RAM test:
Which option to choose depends on the user's intentions. Needless to say, when choosing the first option, you need to save your work and quit running applications, as the message displayed in the window reminds you of.
To launch this tool from the Control Panel, you need to select “Administrative Tools” in it, and in the list that appears on the right side of the window, select “Windows Memory Checker”:

Further actions of the user and computer are the same as when running the test from the command line.
Built-in memory checker settings
It is recommended that you run this tool with the default settings first. If no problems with RAM were found, then a more detailed analysis can be carried out. To do this, you need to run the built-in test again and press the F1 key while running it, after which the settings menu appears, which you can navigate with the arrow keys and Tab. This tool provides three analysis modes, differing in the set of tests, completeness and completion time:
- Basic – lasts a few minutes.
- Standard – takes about an hour.
- Extended – up to several hours.
With default settings, all tests are performed in two passes. This value can be changed from 0 to 99. If set to 0, the test will run indefinitely until the user stops it, which can be done by pressing the Esc key.
Successful completion of the RAM test is indicated by the appearance of a window like this:

Checking memory at boot
This is another option for running the built-in test, which is used when, due to problems with RAM, you cannot even boot Windows. To start it, after turning on the computer, use the F8 key to make a menu with additional boot options appear, then successively press the Esc, Tab and Enter keys:


The built-in diagnostic tool will launch:

Upon completion of the check, Windows 7 will automatically reboot and its normal operating mode will begin.
Checking RAM using the Memtest86 utility
Many third-party utilities have been developed for RAM tests, but Memtest86 is deservedly considered the “king” among them. It differs from many similar programs in that it has its own bootloader and is launched from bootable media (for example, a flash drive or CD). This allows her to more thoroughly diagnose the performance of RAM. Unfortunately, this utility has two drawbacks:
- The need to obtain bootable media from the distribution iso file. This should hardly be considered a disadvantage - that is why the program does not require any OS and does not depend on it.
- Quite a long test execution time (more than 1 hour).
In what cases should it be used:
- Of course, the first and most common case is that the OS does not load, or a BSOD appears.
- If your PC is unstable.
- Diagnostics of purchased and non-functioning RAM modules.
- For fine-tuning timings when overclocking system components.
What to do if tests find problems
If errors were identified during testing in any way, or the tests could not even complete, then this is a clear sign that one or more RAM sticks are faulty. What to do in such cases:
- Don't rush to purchase new planks. First, remove all the strips from the slots and reinsert them. Just remember to turn off the computer before doing this and remove static electricity from yourself by touching the computer case.
- If it takes a lot of effort to remove and install the slats, it means that you either forgot about the latches of the slats, or you are inserting them incorrectly.
- Gently wipe the contacts of the strips with an eraser to remove plaque formed as a result of their contact with air and subsequent oxidation.
- Install the brackets into the motherboard slots, turn on the computer and repeat the test. It is possible that the test will end successfully.
A computer's RAM is an extremely important component of its system. Its volume may vary, it all depends on what tasks your PC is oriented towards. So, for example, weak laptops designed for everyday tasks have a small amount of RAM, while the same gaming “machines” have the maximum.
Often a user needs to find out the computer's RAM if, say, he has forgotten some data. This is very simple to do, so much so that even an inexperienced user can easily cope with the task. So, let's find out together how to find out the RAM of a Windows 7 computer. Previously, I already talked about and.
How to find out the amount of RAM
To find out the amount of RAM on your computer, do the following:
- Go to “My Computer” by clicking on the corresponding shortcut on the desktop or using the Win+E key combination.
- In the header of the window that opens you will see the active line “System Properties”, click on it.
- Next, another window will open, find the “System” section in it;
- Now carefully study the contents of the window that opens, because it contains a grouped description of the system data of your device, as well as some others, including RAM. Find the line “Installed memory” - it will indicate the amount of RAM you have.
Checking RAM
It often happens that some kind of failures, malfunctions, errors occur in the system, and from knowledgeable users you can hear the phrase “check your RAM.” But how is this done? It’s very simple, and you don’t need to download anything additional; you can use the built-in special application.
So, open the start menu, now in the “Search” line enter “Windows Memory Checker” without quotes, of course. You will see the result found by the system, click on it. Next, a window will open in which you need to choose one of two options: either run the scan now, or the next time you turn on the computer. If you select the first option, the PC will immediately reboot, after which the scan will start. The result will be available the next time you log in. By the way, after the check is completed, the computer will reboot again, and you will be able to continue working on it.

To summarize, I note that RAM is the most important component of any computer, which affects its performance. Of course, the more RAM a device has, the faster and more productive it will work.
According to Wikipedia, RAM is a volatile part of a computer memory system that temporarily stores the input, output, and intermediate data of a processor program. The amount of RAM determines the number of tasks that can be simultaneously performed under the operating system.
Purely theoretically, the more RAM, the better, since it will allow you to run several “hungry” applications at once. Moreover, if you consider that even one running browser with a couple of open tabs can easily consume more than 1 GB of RAM, the words about its volume seem true. But in practice, 4 GB will be enough for the user, and even more so if the memory capacity reaches 8 GB.
Today I will tell you how to find out the amount of RAM in your computer or laptop. Windows 7 is used as an example.
Click on the “Start” button, then go to “Control Panel”. Here we find the “System” section.

Once in the desired section, you can find basic information about your PC, including the Windows version, processor model and, of course, the amount of RAM. I highlighted it in the screenshot.

This is the simplest and most convenient way. By the way, you can get to the “System” section in another way. To do this, you need to find the “Computer” icon on your desktop, right-click on it and select “Properties”.

In order to find out how much memory is currently being used, you will have to use. If you remember, I recently told you how you can launch it. The easiest way is to simultaneously press the Ctrl+Shift+Esc keys (relevant for Winodws 7). Alternatively, press the Ctrl+Alt+Delete key combination and select Task Manager from the list of options.
Open the “Performance” tab - this is where you can see how much memory is available, how much is available at a given second, how much is cached and how much is free.

I hope my simple instructions helped you.
- In contact with 0
- Google+ 0
- OK 0
- Facebook 0