Installing an operating system in today's realities has become a very simple and understandable procedure. However, in some cases problems arise, such as the absence of the hard drive on which Windows was planned to be installed in the list of available media. In this article we will figure out why this happens and how to solve this problem.
The operating system installer may not “see” the hard drive in two cases. The first is a technical malfunction of the media itself. The second is the absence of a SATA driver in the assembly. The faulty disk will have to be replaced with another, but we’ll talk about how to solve the problem with the driver below.
Example 1: Windows XP
On Win XP, if problems arise with the disk during installation, the system goes into BSOD with error 0x0000007b. This may be due to the incompatibility of the hardware with the old “OS”, and specifically due to the inability to determine the carrier. Here, either setting up the BIOS or introducing the required driver directly into the OS installer will help us.
Example 2: Windows 7, 8, 10
Seven, like subsequent versions of Windows, is not as prone to failures as XP, but similar problems may arise during their installation. The main difference is that in this case there is no need to integrate drivers into the distribution - they can be “thrown in” at the stage of selecting a hard drive.
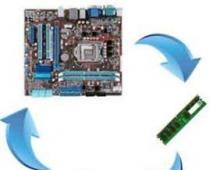
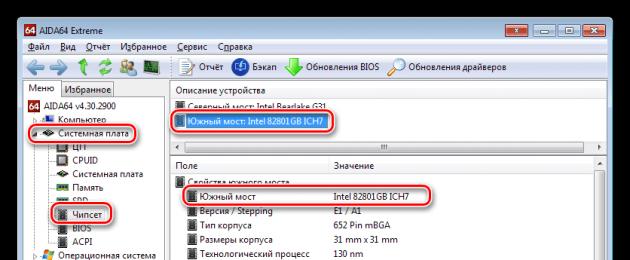
First you need to get the necessary driver. If you looked at the article about XP, then you know that almost any drivers can be downloaded from the website DDriver.ru. Before downloading, you should determine the manufacturer and model of the motherboard chipset. This can be done using the program.

On this page, select the manufacturer (AMD or Intel) and download the driver for your operating system, in the case of AMD,

or the very first package on the list for Intel.

- The first step is to unpack the received files, otherwise the installer will not detect them. To do this, you can use 7-Zip or WinRar.
Drivers from the "red" ones are packaged in one archive. Extract them to a separate folder.

Folder with the unpacked package\Packages\Drivers\SBDrv

Then you need to select a folder with the bit depth of the system being installed and copy all the files to a flash drive or CD.

In the case of Intel, an archive is downloaded from the website, from which it is necessary to extract another archive file with a name corresponding to the bit capacity of the system. Next, you need to unpack it and copy the resulting files to removable media.

Preparations are complete.
- Let's start installing Windows. At the stage of selecting a hard drive, we look for a link with a name (the screenshots show the Win 7 installer; with the “eight” and “ten” everything will be the same).

- Press the button "Review".
- Select a drive or flash drive from the list and click OK.
- Place a checkmark opposite “Hide drivers that are incompatible with your computer hardware”, then press "Further".

- After installing the driver, our hard drive will appear in the list of media. You can continue with the installation.

Conclusion
As you can see, there is nothing wrong with the absence of a hard drive when installing Windows, you just need to know what to do in such cases. All you need to do is find the required driver and perform the steps described in this article. If the media is still not detected, try replacing it with a known good one; a physical failure may have occurred.
I recently received a comment in which a user had a problem installing Windows on a PC; it turns out that the installer does not see the hard drive, so it is not clear where to install the system. Below in the installer the cause of the error is described, which tells us that the disk drive driver is missing and needs to be loaded.
The problem is common and I want to write a short instruction to help people solve it. Let's figure it out.
Find drivers for your hard drive
Modern computers, or rather laptops, with an Intel processor, you can find the necessary drivers on their website. To make it easier, you can enter the following in any search engine: “Intel® Rapid Storage Technology (Intel® RST) Driver”. In the results you can search for the necessary drivers for any operating system.
If you have an AMD processor in your laptop, you can search for drivers using the following query: “SATA/RAID driver (or laptop).”
You can find drivers on the Internet if you simply enter the model of your laptop or computer motherboard.
Installing a driver if Windows does not see the hard drive during installation
Next comes the most interesting part. After you have downloaded the driver, you need to transfer it to, in our case, the flash drive from which you are going to install Windows. Even if you use a bootable DVD, still place the driver on a flash drive and then insert it into your computer. Placing the driver on disk will prevent you from installing it properly.
Start downloading from the flash drive or disk until the installer appears. Then click on the button.

A window will appear where you need to specify the path to the driver, this is our flash drive, click OK. The driver installation will begin, and then you should see your disks and partitions, if, of course, everything was successful.

As a note, I would like to say that if you are installing Windows on your computer for the first time, and after installing the drivers, 3 or more partitions appear in the installer, then you do not need to delete them, format them, or do other actions with them. Manipulations can be carried out only with the largest section. The fact is that the remaining sections are important, since they store data on which will help.
If you yourself cannot do everything that I have written here, then contact specialists and they will be able to fix everything for you for a fee.
There is another option why the Windows installer does not see hard drives, perhaps you need to disable the mode, I have already spoken about this mode several times, for example. It turns off in . But this option is more suitable for Windows XP.

I think we can finish here, I hope this guide will help you in solving your Windows installation problem.
The hard drive is one of the most important hardware components of a computer, without which it is impossible to save any data. When the user turns on the computer, the first step is to recognize the BIOS hardware, including connected hard drives, and then the boot record is determined, after which control is transferred to the operating system. But it happens that there is a failure in this chain.
In such cases, the computer either does not see the hard drive completely, or it is not displayed in Explorer. If it is a system drive, Windows will not boot and an error will appear on the screen. Most often it is “WARNING! HARD DISK NOT FOUND" or "DISK BOOT FALTURE, INSERT DISK AND PRESS ENTER", but there may be other messages indicating the absence of a hard drive.
The reasons why a hard drive is not detected can be either hardware or software in nature, but most often they are associated with hardware problems. What to do if the computer does not see the hard drive? The first step is to rule out faults in the hardware and only then look for what’s wrong with the software.
Hard drive is not detected in BIOS
The hard drive may not be accessible in Explorer or Device Manager, but it should be visible in the BIOS. If it is not detected in the underlying I/O system, it may indicate a hardware problem. Consistently check the correct connection of the cables, make sure that they are in good condition (you can try replacing them). Pay special attention to the quality of the contacts, see if there are any traces of oxidation on them. The disk itself may also be faulty. The easiest way to find out if everything is okay with it is to connect it to another computer.
On computers with two physical disks, you should pay attention to a special connector located on the HDD case between the power and data connectors. If you look closely at it, you can see four pairs of contacts and a special jumper that closes one of the pairs. This jumper is used to change the priority of the hard drive. If the disk is the main one, the jumper must be set to the Master position; if it is an additional one, it must be set to the Slave mode. Setting this jumper to the same position on both media will most likely prevent the BIOS from recognizing them correctly.

Note: The jumper for switching between priority modes is not present on all hard drive models.
All of the above mostly applies to ordinary prefabricated PCs, but with laptop computers everything is a little more complicated. If the laptop does not see the hard drive, and you suspect that it is due to hardware problems, you may have to limit yourself to checking the contacts of the drive, the corresponding connectors of the motherboard and the drive itself. It is not recommended to disassemble a laptop without the appropriate knowledge and experience; in such cases, it is better to take the device to a service center.
If everything is in order with the hardware, check the settings of the BIOS itself - the SATA and IDE controllers should be enabled. In different BIOS versions, the names of the settings you need may have slight differences, but usually they always mention the word SATA (ATA) or IDE. If this is an Ami BIOS, the required setting will most likely be located in the section Advanced – Onboard Device Configuration. Go into it and find a controller whose name mentions SATA or IDE. Make sure it is set to Enabled.

In the Award BIOS, you need to go to the Integrated Peripherals section and make sure that the On Chip Primary PCI IDE and On Chip Secondary PCI IDE parameters are Enabled, and the On Chip SATA Mode parameter is set to Auto.

As a last resort, you can try resetting the BIOS to factory settings. There are six reset methods in total, but only two will be available to you. Here's the first one. With the power turned off completely, find the Clear CMOS jumper on the motherboard, switch the jumper from pins 1-2 to 2-3, wait 20 seconds, and then return it to its original position.

And here is the second way. After turning off the power, find the CR2032 battery on the motherboard, remove it, also wait a minute and reinsert it. The BIOS will be reset. You can reset the BIOS on laptops in the section Exit – Load Setup Defaults, but this is only possible if the manufacturer does not have password protection installed, otherwise the device will have to be disassembled in order to remove the battery.
The disk is detected in the BIOS, but the system does not see it
Things are somewhat different when Windows 7/10 does not see the hard drive, but it is perfectly detected by the BIOS. If it is a system drive, Windows will naturally not boot, and it is important to understand what exactly is causing the problem. These could be problems with the disk itself, incorrect BIOS settings, or damage to the operating system. The latter is important to exclude. To do this, try to access the hard drive data by booting from a LiveCD or flash drive.
If the disk is visible in the built-in LiveCD file manager, most likely there is something wrong with the operating system itself. In other cases, the first thing to do is go into the BIOS and see if your boot priorities are set correctly. By the way, the Operating System not found error may indicate a lost priority. In Ami BIOS you can do this on the tab Boot – Boot Device Priority, and in Award BIOS – in the section Advanced BIOS Features – First Boot Device.

Also in the Edward BIOS you need to make sure that in the Standard CMOS Features section the mode for the hard drive is set to Auto.
All of the above is true for additional (second) disks. If everything is fine with the BIOS settings, but the computer does not see the second hard drive, check the following points:
– By opening the Disk Management utility through the Start menu, find your disk in the list and make sure that it is initialized. If not, right-click on it, initialize it, and then create a new volume on the disk.


– Disk space is not allocated. Again, create a new volume.

– The drive letter is not assigned. Assign a free letter to it, otherwise it will not be displayed in Explorer.


– The file system of the media is defined as RAW. Format the disk or perform a file system restore with the command chkdsk [drive letter]: /f. Alternatively, you can use special utilities like TestDisk for this.


– Disk drivers are damaged or not installed. Open Device Manager, look for your second drive under Disk Devices, and see if it has a yellow sign. If checked, this may indicate that the necessary drivers are missing. Download drivers from the official website of the disk manufacturer and install them.

The case when the computer does not see the hard drive when installing Windows 7/10 deserves special attention. This problem is quite common on laptops with caching SSDs, SATA drives and RAID arrays. Its main reason is the lack of specific drivers that allow working with such configurations. It doesn’t matter, you can download drivers from the official website of the manufacturer of your laptop model or motherboard. The names of such drivers usually contain the words "SATA", "Intel RST" or "RAID".
Copy the driver to the USB flash drive from which you are installing Windows and boot from it. When an empty window appears for selecting a partition to install the system, click “Download”, specify the path to the copied driver and install it.


If the system is installed from an optical disk, the driver file is also copied to a flash drive, which must be connected to the laptop/computer before turning it on, otherwise the portable media will not be recognized. After installing the driver, the disk should appear in the installation wizard window.
The computer does not recognize an external hard drive connected via USB
What to do if the computer does not see the hard drive connected via USB? Almost everything is the same as mentioned above. The only difference is that in the BIOS we check whether USB controllers are enabled. In Award BIOS these are USB EHCI controller, USB EHCI controller, USB Keyboard Support, USB Mouse Support and Legacy USB storage detect; in AMI, USB device settings are usually located in the Advanced – USB configuration or Advanced – Peripherals section.
Problems with USB ports. Their serviceability also needs to be checked.
Lack of power is another reason why an external drive may not be recognized by the system. If possible, do not use extension cords; the connection itself must be made through the port on the rear panel. If possible, use an autonomous power source when connecting drives, this will increase the stability of the drive. And one last thing. An external drive may not be recognized by Windows for the same reasons why the system does not recognize flash drives and other USB-connected devices. We recommend that you read the article; perhaps you will find a lot of useful information in it.
Problems with hard drive detection can arise in different situations: when installing Windows XP, 7, 8 or 10, connecting a second or external hard drive. Depending on the conditions under which the error occurred, the methods for eliminating it differ significantly.
Search for disk during installation
If during installation Windows does not see the hard drive, then the cause of this error is the lack of necessary drivers. The crash usually appears on laptops and ultrabooks with SSDs. The Windows installation program does not contain the necessary software, so in order to install XP, “seven”, “eight” or Windows 10, you must first install the drivers.
Check your computer's specifications. You need to find out which processor is used - Intel, AMD. For Intel computers, you need to download the Intel® Rapid Storage Technology driver. If you have an AMD processor, then look for the necessary software using the query “SATA/RAID driver + motherboard model”.
- Download and unpack the data archive. Place it on the Windows installation flash drive. If you are installing XP from a disk, then transfer the driver to the USB flash drive anyway; it must be connected along with the installation disk before turning on the computer.
- Start installing Windows 10, 8, 7, XP. When you reach the stage of selecting a section, click on the “Download” link.

- Specify the path to the downloaded driver on the flash drive.

After adding the drivers, you will see the available hard drive partitions and will be able to install Windows XP, 7, 8, 10 on your computer.
External drive detection
If Windows 7 does not see a hard drive that is connected via USB as an external drive, then the first thing you should do is make sure that the correct letter is assigned to the drive.
- Open Control Panel, set the View option to Large Icons. Go to the "Administration" section.

- Launch the Computer Management tool.

- In the menu on the left, find the “Storage Devices” section and launch the “Disk Management” tool.
On Windows 8 and 10, the procedure is completely identical; on XP there are some differences: in particular, the “Administration” section is opened through the “Programs” menu in Start. In any case, in the Disk Management window you should see all the drives connected to the computer: the main, external, second internal.
If the external hard drive is correctly detected by the system, right-click on it and select “Change letter”. Assign a letter that is not already used in the system: for example, X or M. 
If the external hard drive is new and you haven’t written anything to it yet, then try formatting it so that the hard drive can be recognized in the system. Formatting will delete all data, so you need to be sure that there is nothing important on the media. An unformatted external drive will be labeled “Unallocated.”
- Right-click on the disk and click “Create Simple Volume.”

- Enter the space size of the new volume. If you want the external disk to consist of one partition, then enter the maximum size, that is, the entire volume of the media.

- Assign a letter and click Next. Format the volume to the NTFS file system. Leave the remaining parameters unchanged.

After formatting is complete, the external drive should be correctly detected by the system and appear in “Computer”. These steps are performed the same on all versions of Windows, from XP to Windows 10. If changing the letter and formatting does not solve the problem, then make sure that the USB port works without errors - look in the device manager controller drivers. Make sure the cable used to connect the external drive is working properly. If previously the hard drive was detected without problems, but now it is not detected by the system, then check it with an antivirus.
Problems with the second disk
If Windows 7 does not see the hard drive connected to the system unit as a second drive, then you first need to make sure that this drive is detected in the Disk Management utility.
- Press Win+R and enter “diskmgmt.msc” to open the Mounted Drive Management Tool. The command is relevant for all versions of Windows, from XP to 10.

- Find the second drive among the connected drives. Look at what status it has - depending on this, the methods for correcting the error will differ.

If there are no error messages, try first simply changing the letter to a value that is not yet used on the system. As for errors, the disk may not be initialized, not allocated, or simply have a RAW file system. How to fix these problems.
The problem when, when installing Windows, the system does not see a single hard drive partition, can cause a lot of inconvenience. Today we will look at what causes this error, as well as how it can be solved.
As a rule, users of modern devices encounter the problem of reinstalling Windows, when the installer does not see disk partitions.
Why does this error occur?
Most often, users of modern laptops with installed SSD drives encounter problems when reinstalling Windows. The fact is that the default Windows installation program does not have drivers for working with this type of disk, so the partitions will not be displayed at all when installing the operating system.
We get the conclusion that in order to install Windows in this case, you will need to install the drivers while the installation program is running.
How to solve a problem?
Below we will look at several ways to solve the problem.
1. If you are a laptop user, you will need to download the necessary drivers from the official website of your laptop manufacturer. You need to search on the manufacturer's website specifically for your device model, and then find the necessary drivers, which may contain words such as RAID, SATA, RST or INF.
2. After downloading the necessary drivers, you need to unpack the resulting archive, and then transfer the resulting drivers to a bootable USB flash drive with the Windows installer.
3. Next, turn off the computer completely, and then insert the USB flash drive into it. Start your computer and boot from the USB flash drive to launch Windows Setup.
4. Once in the menu where the disk partitions should be displayed, click on the button, and then specify the path to the required driver.

5. Once the driver installation is complete, all partitions will be displayed in the Disk Management menu, which means you can continue installing Windows.
Method 2: Using an Alternative Build
For each version of Windows you can find a fairly large number of assemblies, which may differ in the number of drivers preinstalled in it.
If the first method of solving the problem does not suit you, we recommend that you try to find an alternative build of Windows that contains an expanded list of drivers. According to statistics on the Internet, one of the most popular assemblies is called "Zver" and, as a rule, it contains drivers for most modern devices.
Method 3: Disable ACHI mode
Your hard drive may be running in ACHI mode, which may prevent Windows Setup from detecting any partitions in some cases. The solution to the problem is to switch the hard drive from ACHI to any other available one.
1. To complete this procedure, you will first need to enter the BIOS. To do this, when you turn on or restart your computer, you need to press the hotkey responsible for logging into it: as a rule, this is either the F2, or Del, but there are others.
2. Once you enter the BIOS, you will need to open the section for changing the hard drive connection mode. It could be "SATA Mode", "Configure SATA As" and the like.
3. If, once you get to the desired section, you see that the checkmark is next to the “ACHI” item, change it to any other available one, save the changes and try to continue installing Windows. If after this the sections still do not appear, return to the previous settings.

And finally
We cannot exclude the possibility that the hard drive has completely failed, which is why the installation program, of course, cannot detect it.
Checking this probability is quite simple: to do this, you will need to enter the BIOS, and then see if the hard drive is detected in the BIOS. To do this, go to the main boot device selection menu (as when installing Windows) and check if the HDD item is available. If not, your hard drive may have failed altogether.
- In contact with 0
- Google+ 0
- OK 0
- Facebook 0