Often when working on the Internet, beginners have a problem - taking a screenshot of the screen (photo of the page). Now we will quickly and step by step figure it out.
If you need to take more complex types of screenshots for your work, then it is better to use special utilities that can be downloaded on the Internet for free.
So, the easiest way to take a screenshot is
1. On the keyboard, find a button with this inscription and click on it
Or the button may have the inscription: PrtSc
2. Go to the graphic editor “Paint”, which is installed on almost any computer.
To do this, at the bottom of the computer monitor in the left corner, click “Start” - “All Programs” - “Accessories” - “Paint” (Fig. 1)

Fig. 1 “how to take a screenshot”
3. Place the mouse on the arrow anywhere in the window that opens and simply click.
Then press two buttons simultaneously “Ctrl” + “V” (Fig. 2) That’s it, the screen is ready and now all that remains is to send it to the folder.

Fig. 2 “how to take a screenshot”
Send screenshot to folder
1. In the upper left corner (see arrow in Fig. 3), click “Selection” and select the area we need.

Fig. 3 “how to take a screenshot of the screen”
2. In the center of the selected area, right-click the mouse to open the menu window and click “Copy to file” (Fig. 4)
3. In the window that appears, select the folder to save and enter the name of the file (in this case, “scrin-stranizy”) and click “Save”.

Fig. 4 “how to take a screenshot of the screen”
Now the file is saved as a bitmap (in the bmp,dip extension).
How to change screenshot extension
To convert it to another extension, say GIF or JPEG:
1. Click on the drawing twice, sending it again to “Paint”.
Fig. 5 “how to take a screenshot of the screen”

Fig. 6 “how to take a screenshot of the screen”
That's it, the work is finished. Now you have a screenshot of the screen (page), which is easy and convenient to work with.
(Visited 534 times, 1 visits today)
Hello.
Who among us has not wanted to capture some episode on a computer screen? Yes, almost every novice user! You can, of course, take a picture of the screen (but this is too much!), or you can take a picture programmatically - that is, as it is correctly called, a screenshot (the word came to us from English - ScreenShot) ...
You can, of course, take screenshots (by the way, they are also called “screens”) and in “manual mode” (as described in this article:), or you can configure one of the programs presented in the list below once and receive screenshots by pressing just one key on the keyboard!
It is about such programs (more precisely, about the best of them) that I wanted to talk about in this article. I will try to present some of the most convenient and multifunctional programs of their kind...
F astStone Capture

FastStone Capture window
One of the best programs for creating screenshots! She has helped me out more than once and will help me out again :). Works in all versions of Windows: XP, 7, 8, 10 (32/64 bits). Allows you to take screenshots from any windows in Windows: be it a video player, a website or some program.
I will list the main advantages (in my opinion):
- the ability to take a screenshot by setting up hot keys: i.e. press the button - select the area you want to screenshot, and voila - the screenshot is ready! Moreover, hotkeys can be configured to save the entire screen, a separate window, or select an arbitrary area into a screenshot (i.e., very convenient);
- after you have taken a screenshot, it will open in a convenient editor where you can process it. For example, change the size, add some arrows, icons and other elements (which will explain to others where to look :));
- support for all popular image formats: bmp, jpg, png, gif;
- the ability to auto-load when Windows starts - thanks to which you can immediately (after turning on the PC) take screenshots without being distracted by launching and configuring the application.
S nagit
![]()
A very popular program for taking screenshots. It has a huge number of settings and various options, for example:
- the ability to take screenshots of a specific area, the entire screen, a separate screen, scrolling screenshots (i.e. very large tall screenshots 1-2-3 pages high);
- converting one image format to another;
- There is a convenient editor that will allow you to carefully trim the screen (for example, make it with uneven edges), add arrows, watermarks, change the size of the screen, etc.;
- Russian language support, all versions of Windows: XP, 7, 8, 10;
- there is an option that will allow you to take screenshots, for example, every second (well, or at the time interval that you set);
- the ability to save screenshots to a folder (each screen will have its own unique name. The template for specifying the name can be customized);
- the ability to customize hot keys: for example, you configured buttons, clicked on one of them - and the screen is already in the folder, or opened in the editor in front of you. Convenient and fast!

Options for creating screenshots in Snagit
The program also deserves the highest rating, I recommend it to absolutely everyone! Perhaps the only negative is that a fully functional program costs a certain amount of money...
G reenShot
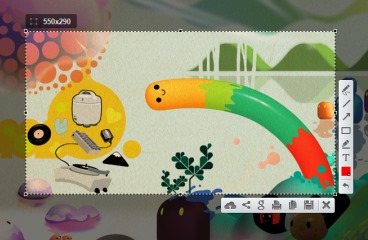
Another cool program that allows you to quickly get a screenshot of any area (in almost 1 second! :)). Perhaps, it is inferior to the previous one only in that it does not have such a large number of options and settings (although, perhaps, for some this will be a plus). However, even those that are available will allow you to quickly and easily make high-quality screenshots.
In the program's arsenal:
- a simple and convenient editor in which screenshots are saved by default (you can save them automatically directly to a folder, bypassing the editor). In the editor you can change the size of the picture, crop it beautifully, change the size and resolution, and add arrows and icons to the screen. In general, very convenient;
- The program supports almost all popular image formats;
- practically does not load your computer;
- made in the style of minimalism - i.e. there is nothing superfluous.
By the way, the view of the editor is shown in the screenshot below (such a tautology :)).

Fraps
(Note: a special program for creating screenshots in GAMES)
This program is designed specifically for creating screenshots in games. But not every program can take a screenshot in a game, especially since if the program is not designed for this, your game may freeze, or you may experience lags and freezes.
Using Fraps is very easy: after installation, run the utility, then open the ScreenShot section and select a hotkey (which will take screenshots and send them to the selected folder. For example, the photo below shows that the F10 hotkey and screenshots will be saved to the “C:\Fraps\ScreenShots” folder).
The screen format is also set in the same window: the most popular are bmp and jpg (the latter allows you to get very small screenshots, although they are slightly inferior in bmp quality).

Fraps: ScreenShot settings window
An example of how the program works is presented below.

Screenshot from the computer game Far Cry (small copy).
By the way, in order for screenshots to be saved on your desktop and not uploaded to the Internet, you only need to adjust one switch in the program settings. Click on the program icon in the lower right corner of the screen and select the “save location” option.

Where to upload screenshots - ScreenCapture
In addition, if you save pictures to your desktop, you can select the format in which they will be saved: “jpg”, “bmp”, “png”. It's a shame the "gif" is missing...

How to save screenshots: choosing a format
Overall, an excellent program, suitable even for completely novice users. All main settings are displayed in a prominent place and can be easily changed. Moreover, it is completely in Russian!
Among the shortcomings: I will highlight the installer, which is quite large in size - 28 MB * (* for this kind of program this is a lot). And also the lack of support for the gif format.
Light Shot
(Russian language support + mini-editor)
A small and simple utility for creating and easily editing screenshots. After installing and launching the utility, to create a screenshot, just click on the “Preent Screen” button, and the program will prompt you to select an area on the screen, as well as where you will save this picture: on the Internet, on your hard drive, on social media networks.
Light Shot - selecting an area for the screen.
In general, the program is so simple that there is nothing more to add :). By the way, I noticed that using it it is not always possible to screen some windows: for example, with a video file (sometimes, instead of a screen, there is just a black screen).
J Shot
Developer website: http://jshot.info/
A simple and functional program for creating a screenshot of the screen. What’s especially pleasing is that this program has the ability to edit a photo. Those. After you have taken a screenshot of an area of the screen, you are offered several actions to choose from: you can immediately save the picture - “Save”, or you can transfer it to the editor - “Edit”.

This is what the editor looks like - see photo below

Screamshot Creator
A very “light” (weighs only: 0.5 MB) program for creating screenshots. Using it is very simple: select a hotkey in the settings, then click on it and the program will prompt you to save or discard the screenshot.

Screenshot Creator - taken screenshot
If you click save: a window will open in which you will need to specify the folder and file name. In general, everything is quite simple and convenient. The program works very quickly (even if the entire desktop is captured), and it is also possible to capture part of the screen.
P icPick (in Russian)
A very convenient program for editing screenshots. After launch, it offers several actions at once: create an image, open it, determine the color under your mouse cursor, and capture the screen. Moreover, what is especially pleasing is that the program is in Russian!

PicPick Image Editor
How do you proceed when you need to take a screenshot and then edit it? First, screenshot it, then open some editor (Photoshop for example), and then save it. Imagine that all these actions can be done with one button: the picture from the desktop will be automatically loaded into a good editor that can handle most of the most popular tasks!

PicPick image editor with added screenshot.
Shotnes
(With the ability to automatically post screenshots on the Internet)
A very good screen capture utility. After you remove the desired area, the program will offer several actions to choose from:
- save the image to your computer’s hard drive;
- save the picture on the Internet (by the way, it will automatically place a link to this picture on the clipboard).
There are small editing options: for example, highlight some area in red, draw an arrow, etc.
Shotnes Tools - Shotnes tools
For those who develop websites - a pleasant surprise: the program has the ability to automatically convert any color on the screen into code. Simply left-click on the square area, and without releasing the mouse, move to the desired location on the screen, then release the mouse button - and the color is determined in the “web” line.
Define color
S creen Presso
(screenshots with the ability to scroll the page, to create high-height screenshots)
A unique program for creating high-height screenshots (for example, 2-3 pages high!). At least, this function, which is in this program, is rare, and not every program can boast of similar functionality!
I’ll add that the screenshot can be made very large, the program allows you to scroll the page several times and capture everything in full!
Video recording / Snapshot of the selected area.
S upper Screen
(Note: minimalism + Russian language)
A very small screen capture program. To work, you need to have Net Framework 3.5 installed. Allows you to perform only 3 actions: save the entire screen into a picture, or a pre-selected area, or an active window. The program does not fully justify its name...

SuperScreen - program window.
E asy Capture
But this program fully lives up to its name: it takes screenshots easily and quickly, just by pressing one button.
By the way, the good news is that she immediately has a mini-editor in her arsenal, reminiscent of regular paint - i.e. you can easily edit your screenshot before posting it for public viewing...
Otherwise, the functions are standard for programs of this kind: capturing the entire screen, active window, selected area, etc.
EasyCapture: main window.
Lip2Net
(Note: easy and fast adding screenshots to the Internet + receiving a short link to the screen)
Quite a popular program for creating screenshots! I’ll probably say a banality, but “it’s better to try once than to see or hear 100 times.” Therefore, I recommend that you launch it at least once and try to work with it.
After starting the program, first select the function of capturing part of the screen, then select it, and the program will open this screenshot in the editor window. See below picture.

Clip2Net - a screenshot of part of the desktop was taken.

Results of publishing the screenshot on the Internet.
-----------------------
This concludes the review of the best programs (in my opinion) for capturing the screen and creating screenshots. I hope that you find at least one graphics program useful. I would be grateful for any additions on the topic.
If you need to crop or correct a screenshot on an Android gadget, this can be done both in the standard Gallery application and in the editors of popular instant messengers. We will tell you about both options.
How to Edit a Screenshot in Android Gallery
First, take a screenshot on your gadget. Most often, this involves pressing and holding the Volume Down and Power buttons at the same time. The method may differ depending on the smartphone model.
If a screenshot is taken, the screen will blink with the sound of the camera shutter. On many models, you can immediately click on the “Change” button. If your smartphone does not provide this option, open the desired photo in “Gallery” and select “Edit” here.
In the editor you can rotate or crop the image, apply various filters and slightly correct the image.
How to edit screenshots on WhatsApp, Instagram and Snapchat?

You can also use external applications to creatively edit screenshots. If you send a picture to , after selecting the image, you will have the opportunity to add multi-colored inscriptions to it, circle any objects, or point to them with arrows.
If the image is a photo from your camera, it makes sense to use Snapchat. In these applications, you can edit your photos using filters and stickers, and then save the modified versions of the photo on your smartphone.
So, I recently received a question from a subscriber: “Screenshot. Is it possible to process it? After all, there are advertisements and so on around the main thing.”
Important!
Sometimes for work you need pictures that are later needed for use in documents.
To do this, you need to “photograph the screen” and take part of the photo.
The screen capture process is called Print Screen(print screen) or taking a screenshot.
This can be done in several stages.

1 way. Open in Word .
- open the Word program.
- Right-click "Paste"
- An image of what you “photographed” appears, the screen itself.


- We will use the rest of the image further to work with texts.
Method 2. Opening Photoshop.


- save the selected area by clicking in sequenceFile- Save As
- select the path to save the file (for example, Desktop), its format (TIF, JPG). In order to use an object as a separate picture, you need to save it in these formats. Then the file will be saved as a photo, for example.
- then click OK everywhere
- Then this picture can be used to work in text editors, for posting on the Internet, since it represents a separate object, and not as part of a document with text, as was the case when saving in Word. Plus Photoshop makes it possible to process the picture in more detail: make it black and white, draw additional details, etc.
3 way. Open in Paint .
1. open the Paint program.


5. and now in the picture, select the desired area for cutting with the mouse 

That's all. Perhaps one of the proposed methods will definitely suit you.
Important! Don't forget to download my free PDF book. In it I give 5 reliable, proven services for making money on the Internet for a beginner for a Quick Start and access to an income of 30 thousand rubles per month! (and how you can replicate it).
Editing a screenshot is an important task. To solve this problem we will use the Paint.NET program. Where it is located on your computer is explained in detail in the article “”, and in general that article is basic in relation to this one. Without understanding that article, you will not be able to understand anything in this one.
If you do not have the Paint.NET program, then you should start with the manual “Paint.NET - where to download, how to install.” Having installed the program and taken at least one screenshot, you can start studying this article.
So, after studying the article “How to take a screenshot,” you learned how your screenshot appeared in the Paint.NET program if you followed the first method. What if the second?
For example, I'll take a screenshot of this page. Let me remind you of the steps to find a screenshot on your computer: My computer --> drive “C” --> Program Files --> AnalogX? Capture. Opening the Capture folder we will find our screenshot:
To open it in Paint.NET, hover your cursor over it. The line changes its color: the black text becomes blue and underlined (like a link), the background becomes blue.
Place the cursor on the line “Open with”. You cannot click: the “Image and Fax Viewer” will open (by default). In the window that appears, click on the line Paint.NET.
By the way, it is likely that you do not have the Paint.Net line. Then click on the line “Select a program...”, a window will open:
After one to three repetitions of such actions, your computer will understand what is required of it and will include the Paint.Net program in the list of programs for opening screenshots (as in the previous figure).
So, you click on the line Paint.Net and our screenshot opens:
But we don’t need such a huge screenshot in the article: 1. it takes up a lot of space on the page and 2. “weighs” a lot (in kilobytes).
Reducing screenshot size
Let's assume that your article requires a screenshot of only the page title and its first paragraph. Your entire monitor screen looks like this:
We need the “Toolbar” (pictured on the very left side). If you don’t have it, you need to click on the “Tools” tab in the menu. A drop-down list will appear:
Click on the “Tools” line and the Toolbar appears on the monitor.
In order to cut out part of the image from the entire screenshot, you and I will first need the “Select rectangular area” button (indicated by an arrow in the previous screenshot). Click on it and the cursor turns into a cross. It must be installed (click) in the place from which you plan to start selecting the area that should be cut out. For example, the upper left corner. Drag the cursor, without releasing the left mouse button, diagonally to the right - down. And you will get this picture:
The part of the picture highlighted in light blue is the area that we will cut out. If you don’t like how you marked this area - you captured something unnecessary or, conversely, missed something, just click the cursor anywhere on the screen and the selected area will disappear. Start highlighting from the beginning.
If everything is fine, click on the “Edit” menu and select “Cut.”
Click on it and see that the selected area is covered with a pattern resembling a chessboard. Select “File” from the menu and “Create” from the drop-down list.
A new window appears with the parameters of the selected area:
Click “OK” and a white rectangle appears with the specified dimensions. Again, click “Edit” in the menu, but this time select “Paste” from the drop-down menu:
We see that the cut out fragment of the screenshot was inserted into a rectangle with the dimensions we specified.
Changing the screenshot extension
A little theory. While wandering around the Internet, you have probably encountered situations where some pages opened quickly, while others took a long time. It depends on how many kilobits of information are on the page. The dependence is direct: the more kilobits of information on a page, the longer it takes to load.
Recognized authorities advise not to make pages larger than 40-50 kilobytes (byte = 8 bits). After all, the vast majority of Internet users use dialup, i.e. access the Internet via a telephone line. You know what telephone lines we have. Although, they say, things are getting better. And broadband high-speed Internet is gaining momentum.
I believe that many webmasters make the mistake of making pages that are huge in weight even when they can be made lighter. The logic of their reasoning is simple: I have high-speed Internet access, and so do my webmaster friends. This means that everyone in Russia also has high-speed Internet.
As a result, people leave the site without waiting for the page to load. Will they come back? In any case, in such a situation you will lose part of the audience.
The main “kilobyte” load on the page is graphics, which includes our screenshots.
How to find out how much a screenshot “weighs”? Open the “Capture” folder, in which our camera stores screenshots.
Move the cursor to any created screenshot and you will see a sign appear with information that the size (i.e. weight) of this screenshot is 1.37 MB. Imagine, the weight of a screenshot of the entire screen is 1370 kilobytes of information. And this is when you really need a small piece of a screenshot, like the one presented above. Do you know how much this little screenshot weighs? Only 4.6 kilobytes. Try to calculate how many times lighter it is without a calculator. This is exactly how many small screenshots we can place instead of one big one.
All you need to do is cut out the required part and change the extension. I think you've learned how to cut. Now let's move on to expansion.
The same screenshot with a different extension will weigh differently. The most common extensions on the Internet are gif and jpeg. They give the least weight while maintaining very decent quality.
Let's continue our work on the screenshot “Editing the screenshot”. In the menu bar, click “File” and click “Save As...”.
The following window appears:
Notice the left arrow at the top. Obviously, we need to create a folder (preferably in “My Documents”). Leave Paint.NET alone for now, but do not close it - nothing will happen to your screenshot. After creating a folder, find it using the drop-down list (top right arrow). When the folder name appears in the window, look at the bottom of the Save As window.
By the way, do you think my folder is empty? Not at all. The fact that there is not a single file (screenshot) in this case means that there is not a single file with the PNG extension. Indeed, I don’t work with such an extension. I take screenshots with the gif extension. Why? You'll soon understand.
Click on the drop-down list button and click on the gif.
Oops, here they are our screenshots. The most incredulous can count the number of screenshots in the article up to this point. There are 17 of them, as in the screenshot below:
In the “File name” column we write its name.
- In contact with 0
- Google+ 0
- OK 0
- Facebook 0