First you need to get an initial impression of what a bootloader is. In simple terms, we can say that the bootloader is a utility that helps Windows start immediately after the computer boots. This program is called MBR and contains code for the initial startup of the system.
Accordingly, without such code or if it is damaged, you will encounter errors containing the word Bootmgr. This is the dispatcher that is responsible for handling Windows boot. All this comes down to completely blocking the system, so you will not be able to get to the desktop and even safe mode will be unavailable.
Microsoft has prudently introduced special commands to restore the recording, which makes it much easier to fix the problem. In addition, there are a large number of programs with a similar effect. Both cases will be considered, which will help restore order when starting the system.
Before we begin, we should write that if Windows starts, and failures begin after booting, then the reason is not in the MBR. Here you need to restore other files, so this instruction is not for you.
Recovering the MBR using the standard method
In Windows 7, restoring the bootloader is quite simple, but a prerequisite is the presence of an installation flash drive or disk with the system. Otherwise, we won’t be able to get beyond the error window. If you don't have one, use the following method.
Having found the installation disk, it is not fundamentally important that it comes with native Windows; you can use different builds. Connect USB or insert the disk into your computer, then:
- Go to BIOS or UEFI using Del (or your option);
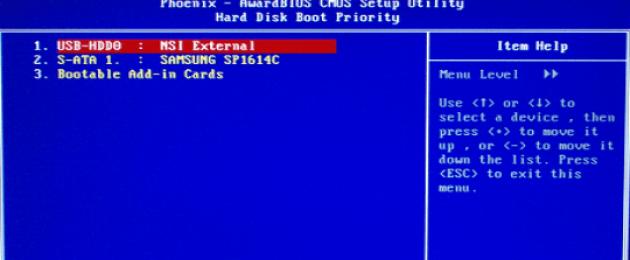
- You should find a section called “boot priority”, most likely this will only be part of the name;
- Set your drive with the system to First and restart;

- Now you will be taken directly to the installation distribution, where you need to select the link below “System Restore”;
- Windows will be searched, and then select it;
- Click "Startup Repair". Troubleshooting and troubleshooting will occur automatically; this does not always help, but it is very easy to use. If it helps you, you don’t have to take further actions;

- Go again to the same section, just select “Command Line”;
- Now enter bootrec /fixmbr - allows you to write the main entry for the bootloader, although it does not change the partition table;
- Insert bootrec /fixboot again - there is a high probability that you can stop at this stage and boot the system;

- Also the control command bootrec.exe /rebuildbcd;
- Additional method when using another utility bcdboot.exe c:windows.
All of the above methods are already built into the system and do not require additional installations of the application, although sometimes you cannot do without their help.
Recovering the bootloader using programs
Restoring the bootloader after installing Windows is also easy when using third-party utilities. The main advantage is that there is no need for a Windows installation disk.
You will need one of the LiveCD programs, which also needs to be written to a disk or flash drive. As an example, we will use a utility that has proven itself to be a powerful and simple tool - Hiren’s Boot CD. It includes many programs for restoring and diagnosing hardware and Windows, including those for working with MBR.
Having created the media with the utility, you need to:
- In the same way as in the previous method, install autorun from the media via BIOS;
- Select “DOS Programs”;
- Now find “Disk Partition Tools”, in which there will be “Paragon...”;

- In the top menu you will see the “Wizards” tab, where the desired item is “Boot Recovery”;
- The checkbox should be set to “Search for copies...”;
- Then don’t forget to check the box next to “Change boot entry” and so on.
The Paragon application is one of the troubleshooting options, but there are others that are no less effective and popular, for example “MBRfix”. It is in the same kit and therefore you do not need to create the media again. You should:
- In the Hiren’s Boot CD menu, select “Mini Windows”;
- After launch, click on start and select the “HBCD Menu” option;
- Then, one by one, go to “Partition/Boot/MBR”, then “Commandline” and finally “MBRFix”.

- Now in the console, run the command MBRFix.exe /drive 0 fixmbr /win7 /yes.
By following one of the suggested options for troubleshooting MBR failures, you can regain access to Windows. Immediately after this, you should check for viruses that could cause the problem. Removing malicious code should not be put off until later in order to avoid troubleshooting on an ongoing basis.
You can choose any of the proposed variations of achieving the goal, depending on the available resources, namely program distributions.
If you still have questions on the topic “How to restore the Windows 7 bootloader?”, you can ask them in the comments
8. Restore Windows 7 boot without installation disk.
Option 1. Automatically - using the Windows RE recovery environment in Windows 7.
During the installation of Windows 7, a service partition is automatically created on the hard drive, providing access to the Windows RE (Recovery Environment). Using this service section, you can:
Boot into recovery environment from hard drive
Create a CD containing the recovery environment
1) Boot into the recovery environment from your hard drive or system recovery disc.
To access the Advanced Boot Options menu, press F8 after turning on the computer (but before loading the operating system).
2) Select the first menu item (Repair your computer) and press Enter.
3) Select the keyboard language in which your administrative account password is set.
4) Enter the administrator password. After entering your password, you will see a window with recovery options.
5) Select an item Startup recovery(Startup repair), the item can also sometimes help System Restore(System Restore), which allows you to return to the point created before the problem occurred.
Option 2. Manual recovery, creating a multi-boot menu.
The main thing here is to get to the command line to enter further commands.
1) Download the archive Bootfiles_x86+x64.zip (contains files: Bcdboot.exe; Bcdedit.exe; Bootsect.exe)
2) Create a Boot folder
3) Unpack the downloaded archive and copy the files Bootsect.exe and Bcdedit.exe of the required bitness to the Boot folder you created.
4) Start the environment required for work:
5) Boot into Windows installed on another drive or recovery environment (On the hard drive, start by pressing the F8 key. If the F8 key is used by the motherboard, after selecting the drive, press F8 again, select the menu item Troubleshooting your computer
6) Launch Command Prompt.
On Windows: Win+R -> cmd -> Ok.
In the recovery environment: Select the keyboard language in which your administrative account password is set. Enter the administrator password. Select an item Command line(Command Prompt)
1) Windows 7 uses an improved boot method - the Boot Configuration Data Store. This store contains all information about all operating systems installed on the computer. Therefore, bootloaders from earlier Windows operating systems cannot be used to start it. So, to restore the boot sector of Windows 7, we rewrite the boot sector on all partitions:
X:\boot\bootsect.exe /nt60 all
where X is the drive letter containing the Bootsect.exe program
2) If you have a second Windows XP system, then you need to perform a number of more actions:
Create a Windows 7 download repository - a repository for Windows XP downloads.
Bcdedit /create (ntldr) /d "Microsoft Windows XP"
If the system refuses to do this, then this storage has already been created, so you just need to rename it:
Bcdedit /set (ntldr) description "Microsoft Windows XP"
Bcdedit /set (ntldr) device partition=C:
Then point the Windows 7 bootloader to the path to the Windows XP bootloader:
Bcdedit /set (ntldr) path \ntldr
Then add a line about selecting Windows XP in the boot menu and placing it under the rest:
Bcdedit /displayorder (ntldr) /addlast
Also, to work with bootloaders, you can use the EasyBCD program, which allows you to perform the above actions using a graphical interface.
For information:
Master Boot Record (MBR), compatible with the operating system loader (ntldr - for Windows XP and bootmgr - for Windows 7/Vista);
Boot files: for Windows XP - ntdetect.com and boot.ini files, for Windows 7/Vista - boot storage - Boot Configuration Data (BCD), which is located in the hidden system folder BOOT.
Option 3: Manual recovery using bootrec.exe.
1) Boot into the recovery environment (On the hard drive, launch by pressing the F8 key. If the F8 key is used by the motherboard, after selecting the disk, press F8 again, select the menu item Troubleshooting your computer(Repair your computer) and press Enter)
2) Select the operating system you want to restore and click "Next".
3) In the window Recovery System Options(System Recovery Options) select Command line(Command Prompt).
4) A cmd.exe command line interpreter window will open, where you should enter:
Bootrec.exe /FixMbr
The /FixMbr switch writes a Windows 7-compatible master boot record to the system partition. This switch does not overwrite the existing partition table. This option should be used to troubleshoot problems with MBR corruption or if you need to remove non-standard code from the MBR.
Bootrec.exe /FixBoot
The /FixBoot switch writes a new boot sector to the system partition using a boot sector that is compatible with Windows 7. Use this switch if at least one of the following conditions is true.
The Windows 7 boot sector has been replaced by a non-standard boot sector
Boot sector is damaged
After installing Windows 7, an earlier version of the Windows operating system was installed on the computer. In this case, the Windows NT Boot Loader (NTLDR) is used instead of Windows Boot Manager (Bootmgr.exe) to start the computer.
Bootrec.exe /RebuildBcd
The /RebuildBcd switch searches all drives for installed operating systems that are compatible with Windows 7. Additionally, this option allows you to select the installed systems that you want to add to the boot configuration data store. This option should be used if you need to perform a complete rebuild of the boot configuration data.
If you don’t remember the value you need, you can simply enter:
and the utility will display help on the available command line switches.
To save your computer from constant resets and restarts when booting, you need to restore the operating system (Windows) in the command line.
The Recovery Console contains most of the most commonly used system commands.
They allow you to fix the problem and get your computer working again in a matter of minutes.
First, you need to have an installation disk on hand or with the version of Windows that was installed on your PC.
Nowadays, USB drives are the most commonly used.
Using a special utility Rufus, we can create such a drive in a couple of clicks.
Like the picture below:
Our installation process will open, you need to wait until all the download files are unpacked.
After unpacking is completed, the following window will open.
Press the key in it R to open the console.
Now you need to enter the number that corresponds to the desired copy of Windows.
In most cases, only one OS is installed, click on the button 1 .
If you have a password set, you need to enter it and press Ok. Or just click Enter.
This will open the Recovery Console.
We can enter any command we are interested in in a text line.
A complete list of them can be obtained by writing
Help .
Fixmbr - this command will help restore the system boot partition.
To confirm any action, press the Latin letter Y and press Enter.
We write and confirm the command
Fixboot , to begin the process of burning the OS to the system disk.
After the process is completed, enter
Exit , to close an unnecessary console.
Then we restart the computer.
VIDEO: MBR recovery on Windows XP, all commands in the recovery console
Recovering MBR on Windows XP, all commands in the recovery console
Commands to restore Windows 7
We will restore our system through safe mode.
When the computer starts, press and hold the key F8 .
In rare cases, its function is taken over by a button Delete.
A boot menu will open in front of us, in which we need to select the item "Safe Mode with Command Line Support". As shown in the screenshot below:
A console will open in front of us in which we need to write the command
Rstrui.exe
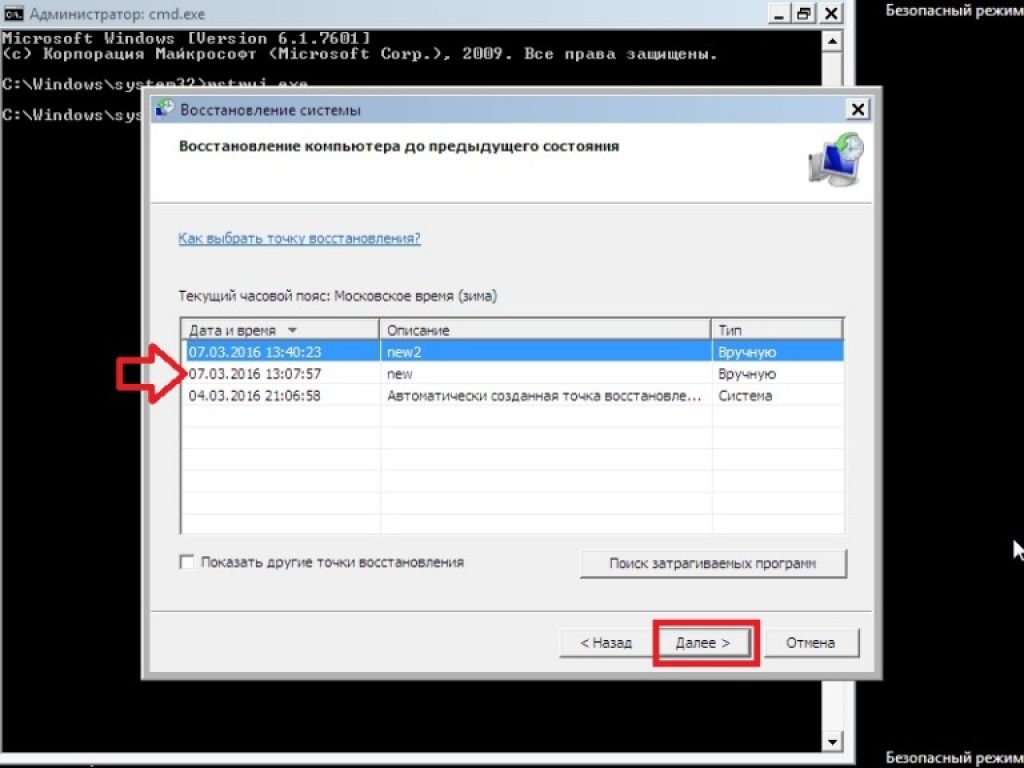
It will open before us "System Restore Wizard"».
It displays a list of saved points to which we can roll back the system.
Among them there will be an automatically created point.
Select the item that interests us and click Further . The recovery process has started.
After this, reboot your .
This method works even when the system is heavily damaged by viruses. This method can be used if the OS does not load at all.
Interesting videos that will further help you understand the problem:
VIDEO: Windows won't boot? Reboot Windows 10, 8 or 7
Windows won't boot? Reboot Windows 10, 8 or 7
During startup, press the key Delete to enter the BIOS subsystem.
Finding the tab « boot» and install our media in first place.
This is done in order to boot the system from it.
While in the BIOS, remember which disk is located first in the “boot” tab. If you have two or more hard drives, the boot will start from the one that does not have operating system data. Put in first place the drive on which you want to install Windows.
Now press the key F10 and press the button Y in the Latin keyboard layout.
The BIOS configuration was successfully saved. After this a window will pop up "Installation Wizards"Windows8".
At the bottom of the screen we find the item "System Restore" and click on it.
From the list provided, select the desired operating system:
Now let's go to the section "Diagnostics" and enter:
Click on "Automatic recovery" and wait for the process to complete.
While in the BIOS, remember which disk is located first in the tab "boot". If you have two or more hard drives, the boot will start from the one that does not have operating system data. Place the drive you want to install on first.
Manually fixing problems
If the automatic mode is powerless, we proceed to manually eliminating bugs.
To do this, in the “ Additional parameters» select a tab "Command line".
Let's start working with the command line.
To begin with, enter
Bootrec /FixMbr - to fix the boot record.
Then we write
Bootrec/FixBoot , to fix the new boot sector.
Then enter
Bootrec/ScanOS . This command will help you find previously installed versions of Windows.
And the last one -
Bootrec /RebuildBcd .
It is designed to provide information about installed OS versions in the download repository.
To complete, enter the Latin Y to confirm all our actions.
As a result, you should have a picture like this:
Now you just need to restart your computer for the changes to take effect.
If all previous actions were unsuccessful, then we will use another method.
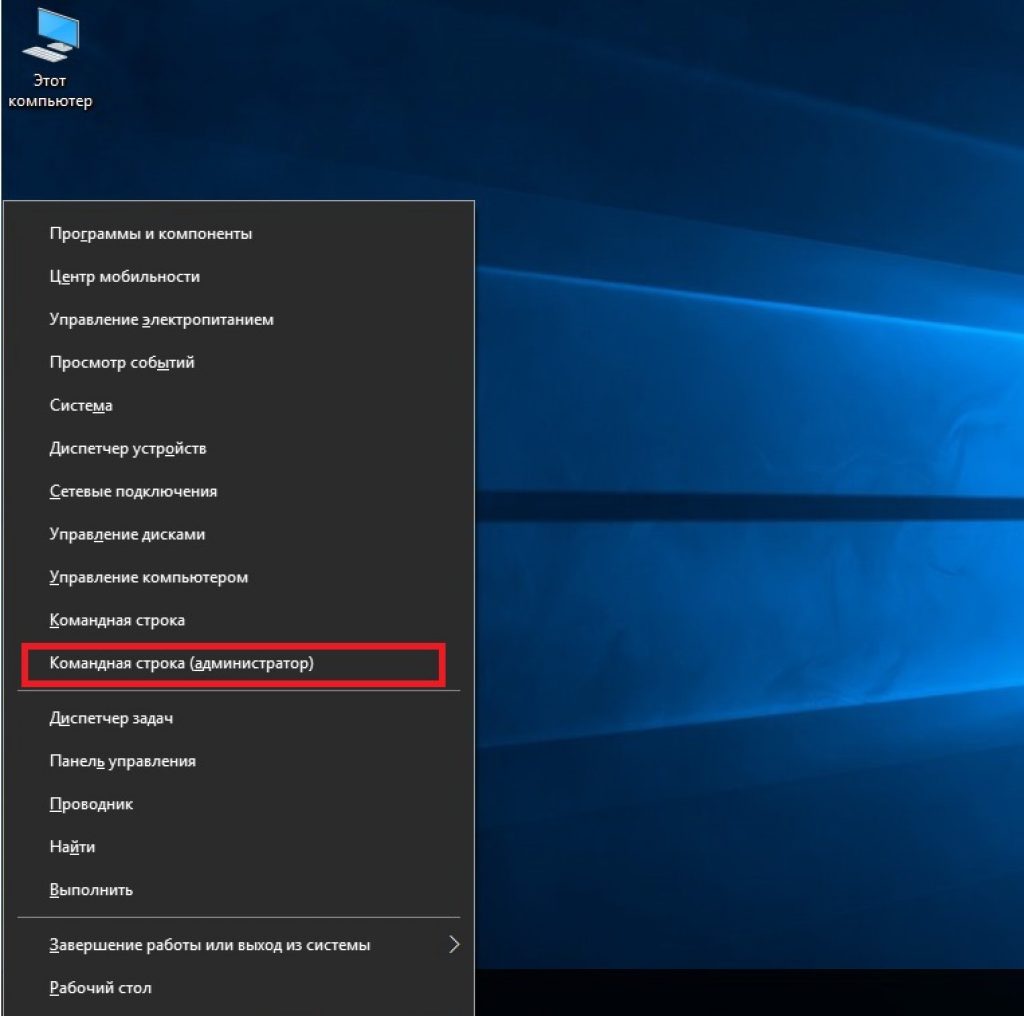
We launch the console using the tools designed for this Win + X.
Finding the point "Command Prompt (Administrator)" and left-click either Enter.
After this, we create a directory for our copy of Windows.
To do this, enter in the required field:
Mkdir C:\Imagen-Restaurar and press the key Enter.
Your actions will not result in any visible changes. Don't be alarmed.
These are the system settings. The console will give you a response after the manipulation is completed.
Leave the computer quiet for 20-30 minutes without performing any additional actions.
When working with the console, never put spaces between words; it is better to replace them with — (hyphen). In cases with spaces, errors and unexpected failures may occur.
When the process is complete, you will see the copy you created, which will appear under the name "WITH:".
You can choose the recording path yourself. You will have two options: an external screw or another local drive.
"Imagen-Restaurar"- the name of the created folder in which our image will be stored.
So, after the process is completed, check for the presence of the file in it "CustomRefresh.wim".
If it is not detected, then click restart and try again.
If you specified the wrong path, you should look for the mounted image in the folder System32.
This is registered as a starting point for Windows system recovery.
WITHIt is worth creating a restore point when the operating system is in order. In the future, you can roll back the OS to the last restore point at any time.
Starting Windows 10 Recovery Mode
Reboot in Safe Mode
Before restoring, you need to make sure that there are no malicious files on the system. If a virus attack has damaged Windows, then it is worth conducting a deep scan of the entire computer.
First of all, we reboot our PC in safe mode. To do this, open the menu "Start".
Find the item and open it by clicking the left mouse button.
Now click on “Update and Security” → “Recovery” → “Special boot options”.
Finding the option "Reboot Now" and select it.
As a result of this, it will open before you.
This item gives us three actions to choose from, select a position "Diagnostics".
In the window that opens, select , and finally
From the proposed list of reboot options, we need "Enable Safe Mode."
Click on the button "Reboot."
This mode can also be selected in a short way: go to "Start", hold down the key Shift and click on the action. The screenshot describes in detail:
The same function can be set by default via the command line.
First, open it (it’s shown above exactly how) and enter just one command:
bcdedit /set (default) bootmenupolicy legacy and press Enter.


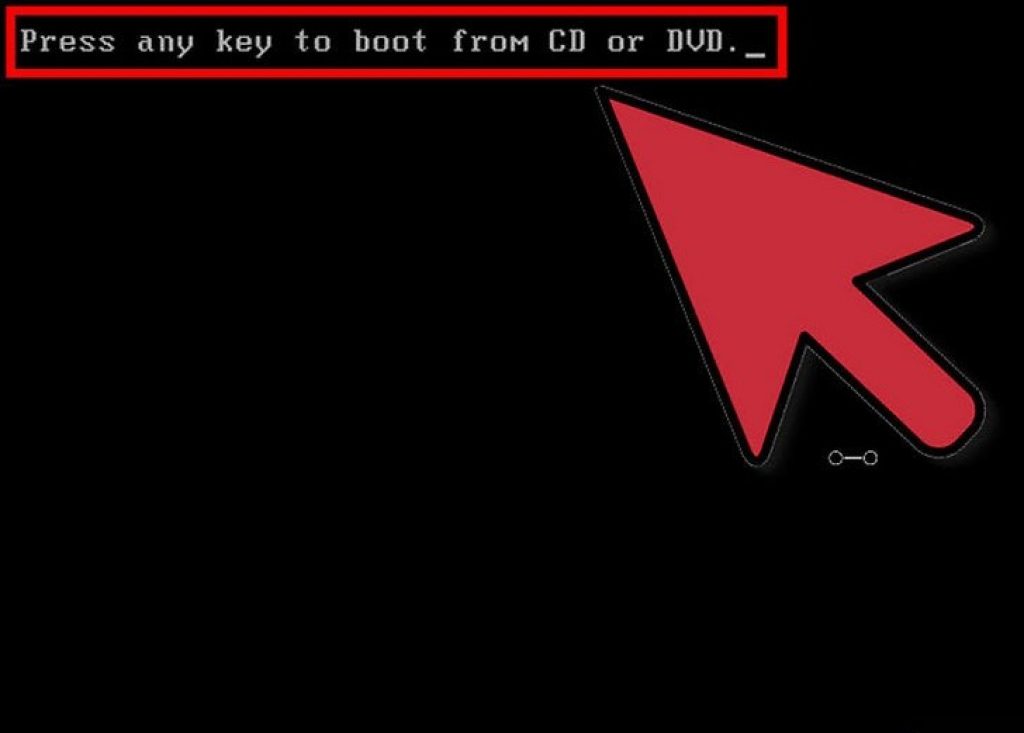


Quite often, personal computer users encounter problems loading Windows. When starting a computer running the Windows 7 operating system, the following message appears on a black screen:
This problem is related to MBR boot record, which is located on your hard drive. At startup the system can't find MBR boot record, which is why this message is displayed. You may ask, where could this boot record have gone? There are several possible answers to this question. The most likely of them is virus attack, in which your bootloader crashed, or was even completely erased. The second reason could be system failure. For example, the power supply was turned off while the computer was running. In this case, files stored on the HDD or SDD, which are responsible for loading the operating system, may be damaged.
Restoring the Windows 7 bootloader using an installation disk or flash drive
At the very beginning, we will need a DVD with a licensed version of Windows 7. This disc contains all the necessary tools that will help us restore the Windows 7 bootloader. What to do if your PC does not have an optical disc reader. In this case, a bootable flash drive with Windows 7 will help you. Microsoft has released a proprietary program “ Windows USB/DVD Download Tool", with which you can create an installation flash drive. To create a bootable USB flash drive, you will need an ISO image of a licensed Windows 7 and a 4 GB flash drive.
If you have prepared a bootable USB flash drive or installation disk, you can begin restoring the bootloader. In our version, the bootable media is a flash drive. The computer used for bootloader recovery includes an MSI A55M-E33 motherboard that has UEFI BIOS support. To boot from a flash drive, you must press the F11 key when the system starts. After pressing the key, the boot menu will open, in which you need to select a bootable USB flash drive. You can do the same if you are booting from a DVD drive.
After booting from the flash drive, after a while the initial installation window will appear.
In this window we should select the item “ System Restore", after which we will be taken to the "" menu.
Next, we’ll use the simplest system recovery option and select “ Startup recovery" After that, troubleshooting and restoration of the Windows 7 bootloader will begin. If the boot record is successfully restored, you will see the bootloader window, which will contain your restored OS, as in the figure below.
By pressing the Enter button, the OS will boot as before.
The method described above does not always work. For those who were unable to restore the bootloader using the method described above, you should use the command line. To do this, in the menu “ System Recovery Options» select the item « Command line».
Now you should run this command: bootrec /fixmbr at the command prompt.
After executing this command, it will happen rewriting the MBR boot sector. But There are times when malware can completely overwrite the bootloader and the rewrite command will not help. If this is your case, then use the bootrec /fixboot command on the command line, which will register a new bootloader on your system.
To see all the commands you can do with the bootloader, you should type bootrec at the command line.
As you can see, if the MBR record has been lost, then restoring the Windows 7 bootloader is a fairly simple task that most PC users can handle.
Preventing MBR boot record from being overwritten
Having successfully restored your bootloader, the next step is to ensure its safety so that overwriting situations do not arise again.
Most often, the main culprit for erasing bootloader files is viruses and various malware. Therefore, you should install antivirus software.
The best comprehensive antivirus products are the following antiviruses:
- Bitdefender Internet Security;
- Kaspersky Internet Security;
- ESET Smart Security;
- AVG Internet Security;
- Outpost Security Suite Pro.
Comprehensive antivirus products, thanks to their modular structure, are superior to conventional antivirus. Judge for yourself, by installing a comprehensive anti-virus package, you will receive:
- Antivirus;
- Firewall;
- Proactive protection.
The main purpose of an antivirus is to search for and neutralize malware. At that time Firewall and projective protection have the main task of protecting against network intrusions and new types of threats. That is, simply put, a firewall and proactive protection prevent malware from getting onto your computer.
We've sorted out anti-virus protection, now let's deal with preventing file corruption bootloader during a sudden power outage. To prevent the computer from turning off during a power outage, it must be connected to uninterruptible power supply. All uninterruptible power supplies have a battery that keeps the computer running after a power outage. The highest quality uninterruptible power supplies are models from the following companies:
- LogicPower;
- Powercom;
- PrologiX.
By choosing high-quality uninterruptible power supplies, you will protect the Windows 7 boot loader from overwriting, and also extend the life cycle of HDD and SDD drives.
In conclusion, I would like to say that if your PC has a high-quality new hard drive installed, a good antivirus, and the computer is powered through a high-quality UPS, then you will not have a problem with the bootloader.
Video on the topic
Windows error correction tools are constantly improving, offering users increasingly automated solutions that allow them to quickly resolve various problems. If you connect the installation media to your computer and select “Startup Repair” in the “System Restore” section, you can fix many errors that prevent Windows from starting. However, if the bootloader is damaged, this method will not work, so if you encounter such a problem, you will have to restore the MBR through the command line.
Running the command line
You will need a boot disk with the distribution of the same system installed on the computer. Not only the version must match, but also the Windows bit depth, otherwise the recovery will not work.
After opening the list of available tools, first perform a startup error fix. If you cannot solve the bootloader corruption problem, go back to the list of tools and select Command Prompt.
Bootrec utility
To rewrite the MBR (data needed to boot Windows) and fix bootloader errors, we will use the utility built into Windows. Enter the “bootrec” command in the interpreter window. After launching this utility, a list of supported commands will appear - run them in order. 

Restart your computer. The bootloader has been restored and the MBR has been rewritten, so Windows should start without problems. If rewriting the MBR did not help fix the startup problem, try using the remaining two commands:

The utility will begin scanning your hard drive, trying to find installed systems. When Windows 7 is detected, run "Bootrec.exe /RebuildBcd". Found systems will be recorded in the boot menu. Exit the utility using the “exit” command and restart your computer. There is no longer any need to rewrite the MBR - Windows will start without errors.
BCDboot utility
If you cannot fix the MBR error, try restoring the bootloader using the BCDboot utility. This tool allows you to create or restore a boot environment located on the active partition of the hard drive. If, as a result of a system failure, the boot environment was moved to another partition of the hard drive, then using BCDboot.exe you will return it to its place.
Open a command prompt and type “bcdboot.exe e:\windows” (attributes are optional). Instead of “E:” you need to put the letter of the partition on which the Windows files are stored. If in the Windows environment this section is designated by the letter “C”, then here it may appear as “D” - take this into account when executing the command. 
- In contact with 0
- Google+ 0
- OK 0
- Facebook 0