- introduce colleagues to the capabilities of Microsoft Publisher 2007;
- Learn how to create booklets in Microsoft Publisher 2007
Step 1
Go to the program in Microsoft Publisher
Start - All Programs - Microsoft Publisher
Step 2
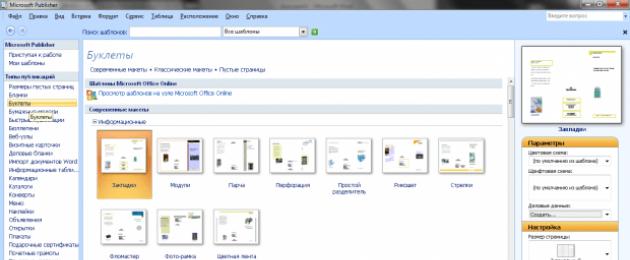
In the left column of our program, select Types of publications - booklets.
From the proposed types, choose the one you need. For example, modules.

Step 3
On the right side of our program in the parameters, select the color and font of your booklet
In the settings, select the page size: For example: 3-panel - CREATE
.png)
Step 4
You will see the type of booklet you have chosen, consisting of two pages.
Let's start creating a booklet. For example, the profession of pharmacist.
We copy the necessary information and pictures to the desktop in advance.
Let's start filling out the text. As in regular Ms Word, select the required font and text color in the top panel.
.png)
Step 5
To insert an image, click on the current image. The image setting is displayed - set the picture. And select the picture prepared in advance on the desktop and click - INSERT.
.png)
And we continue to fill out our booklet. Delete panels you don't need using the DELETE key. You can move, enlarge, or reduce images and text.

.png)
Step 6
To change the background, select Format - Background - Select the background we need
.png)
Step 7
We save the finished booklet. Select: File - Save As - Desktop - Booklet Name - Save.
.png)
Microsoft Publisher is a desktop publishing program that contains many different templates. Using this program, you can create newspapers, brochures, business cards, postcards, advertisements, gift certificates, and web pages, for which Publisher includes many ready-made layouts. And once you have the basic skills to get started with a publication and to change it, you can apply those skills to any type of publication.
Create a new post based on a template
Create a web page based on a ready-made layout.
1. Open the program. Start – All Programs –MicrosoftOffice– MicrosoftPublisher.
2. In the menu File select team Create.
3. In the task area New Post - Start with Layout select Web sites and email.
4. View the proposed web page templates in the program window. When you select the type of publication you want to create, Publisher displays thumbnails of the available templates. To develop a web page based on one of the templates, just click on its thumbnail.
5. When choosing Web Site Builder, in the Wizard window you will need to indicate which pages your site needs (subsequently adding pages is done using the command Insert - Page, and deleting using the menu Edit-Delete page) and then press OK. Publisher will open a copy of the template. After the site template opens, you replace the placeholder text and pictures with your content. You can also change the color scheme and font scheme (see figure), remove or add layout elements, and make any other changes required to ensure that the Web page accurately reflects the style of your specific organization, type of business, or purpose of the Web site. This can be done by displaying Region tasks using the menu View. Select the desired task pane by clicking on small arrow at the top.
6. In the menu File select item Save.
7. In the field Folder Select the folder where you want to save the new website.
8. In the field File name enter a file name (preferably index).
10. After work on your website is completed in the menu File select a team Save as web page. The message will appear on the screen Exporting to format in progressHTML and a file will be created in the folder you specified index. html(the first page of your site), as well as the folder index. files, in which all other pages and all the graphics of your site will be located.
Work with text
Text doesn't just fill all the space between fields and flow from one page to another, as happens in text editors. Instead, the text is placed in a container called Text field, and you structure your posts by placing text boxes on the pages.
You can place a text box where you want on the page, make it the size you want, split it into columns, and combine one text box with another so that text flows between fields even if the text boxes are on different pages.
Even if your publication is based on one of the templates in Publisher, you may need to add an entirely new block of text.
Adding new text is done in two steps:
1. Create a new text field to serve as a container for the text.
2. Enter the required text.
When creating a text field, don't worry about its exact location and dimensions. At any time, the text field can be moved to any location on the page (or off it), and the size of the text field can be changed.
The table below shows three simple ways to change a text field once it's created on a page.
|
Target |
Initial action |
Follow up |
|
Moving a text block |
Place the pointer on the border of the text field. |
When the pointer changes to a cross-shaped arrow, click and drag the field. |
|
Resizing a text field |
Click the text box and position the pointer over one of the round handles. |
When the pointer changes to a double-headed arrow, click and drag the border of the field. |
|
Rotate a text field |
Click the text box and position the pointer over the green rotation handle. |
When the pointer changes to a circle, click the mouse button and drag the marker in the desired rotation direction. |
When you resize a text field, some of the text may not fit in the resized field. To ensure that text remains visible when you resize text fields in your publication, turn on Publisher to automatically resize text by selecting on the menu Format points Auto text selection And Width .
Click the button Text field on the toolbar Objects. (When you open Publisher, the toolbar Objects is positioned vertically along the left side of the Publisher window by default.)
1. Create a rectangle on the page by dragging the mouse.
2. Enter text using the keyboard into the created text field (surrounded by round markers).
If you want to change the appearance of your publication, you have a variety of ways to change the appearance of the text and the fields that contain it.
For example, for change the appearance of selected text can be selected from the menu Format one of the following points.
Font to change the font, size, color, or style.
Paragraph to change the alignment type, indentation, line spacing, and line and page breaks.
List to add bullets and numbering or change their style.
And with the help of the team Text field(on the menu Format) you can change the appearance of the text field:
make the border around the text field visible;
change the background color and border;
rotate text field;
change the gap between the text and the borders of the text field.
Graphic objects in the publication
Term drawing used to refer to a variety of graphics formats and graphics sources, including the following graphic elements:
rectangle, circle, arrow, line or autoshape;
individual graphics files in formats such as GIF (Graphics Interchange Format), JPEG (Joint Photographic Experts Group), BMP (Bitmap), WMF (Windows Metafile Format), TIF (Tagged Image File Format) and PNG (Portable Network Graphics);
collection of pictures;
scanned photographs or images taken with a digital camera.
Replace the placeholder picture by right-clicking it and choosing Change picture. If there is no command in the context menu Change picture, then the picture is part of a group (like the one shown above). Click the picture a second time - gray circles should appear around the perimeter of the picture, then right-click the picture again.
Adding a new drawing to a publication:
In both cases, the first step is to select the source of the new drawing.
|
Type of selected pattern |
Following actions |
|
Collection of pictures |
The task pane will open Collection of pictures, where you can find a picture, photograph, clip or audio fragment to insert. |
|
From file |
A dialog box will open Add a picture, in which you can select the desired graphic file. |
|
From a scanner or camera |
If you have a scanner or digital camera with TWAIN or WIA interface connected to your computer, you can add an image directly from the connected device to your publication. |
If the graphic you want is temporarily unavailable or unknown, you can insert a blank frame into your publication. On the menu Insert select item Picture, and then - item Blank picture frame.
Once a picture is framed on the publishing page, you can change its appearance by following the steps in the following table.
|
Target |
Actions Performed |
|
Add a colored or artistic border |
Click the button Figure format Colors and lines. |
|
Adding a colored background |
Click the button Figure format and use the settings on the tab Colors and lines. Note. The colored background will only be visible in designs with transparent areas, otherwise do not paint the entire frame. |
|
Recoloring a drawing |
Click the button Figure format and use the settings on the tab Picture. |
|
Changing Contrast and Brightness |
Press the Contrast or Brightness buttons: Increase Contrast Decrease contrast Increase brightness Decrease brightness |
Standard text wrapping options:
1. Along the top and bottom edge. Text breaks at the top edge of the picture frame and continues past the bottom edge of the frame
2. Along the contour. The text flows around the outline of the picture rather than around the frame.
3. Around the frame. The text wraps around the frame rather than around the design.
4. Absent. The text is placed as if the picture were missing.
Adding a Link Bar to a Web Page(or site navigation bar)
Select from menu Insert team Panel transitions and select a team Existing. A window will open Layout Libraries. On the bookmark Sections choose Panels navigation and press the button Add an object.
Note that you can add other web elements to the page this way.
To change the properties of the link bar select it with a mouse click and click the button that appears below (see Figure 1)


The Navigation Pane task pane will appear on the screen, where you can set up links to the pages of the website, change their location, and name the website page.
Create a newspaper in Microsoft Publisher
You can't create a newspaper in Microsoft Publisher.
more difficult than Microsoft Office Word or
work in MS PowerPoint. Panels
the controls are similar, but there are some
peculiarities.

Let's open Microsoft Publisher. But we will not use ready-made samples, but will create a clean publication.


Create publications, business cards, calendars usingPublisher
I.Basic objects Microsoft Publisher
The purpose of training: become familiar with the Microsoft Publisher interface and basic Publisher objects.
Required initial level of training for students: initial training.
Exercise: familiarize yourself with the basic elements of the Publisher interface: menus , toolbars.
Theoretical aspects:
Microsoft Publisher- a publishing program that allows you to easily create printed materials ( booklets, leaflets, etc.) at a professional level.
The main goal of the developers of Microsoft Publisher was to provide people with little design experience with a means to create professional-looking publications. Publisher contains a comprehensive set of professional tools for solving complex publishing problems. The program includes:
over 2 thousand templates developed by professional designers,
more than 200 fonts,
thousands of pictures, photographs,
design elements,
sound effects for the Web.
The flexible model of wizard programs allows you to use them at any stage of creating publications.
The main element of documents Publisher, like other publishing systems, are text typing stripes.
In the program, the dial bar is text block- a rectangular area that can contain text and that can be manipulated as a single object.
To place a text block, just select the appropriate function in the toolbar and use the mouse to draw the boundaries of the new block on the page. After this, the block is available for text input. To quickly format text, use familiar styles.
Text blocks can be manipulated like regular objects: moved, resized, rotated, etc.
For a text block, it is possible to set the type of border and fill of the internal area, the method of flowing text around the block, text blocks can be linked in such a way that the text, as one block is filled, begins to flow into another, which is necessary when creating large multi-page documents.
Important function system is table support. Unlike regular Word tables, Publisher tables are independent objects, just like pictures or text blocks. Otherwise, the actions with the tables of these two applications (merging/splitting cells, filling the inside and formatting) are almost the same.
Another important element of the system document is drawings. Publisher, like other Office applications, supports drawings both in internal format (this includes AutoShapes and WordArt) and imported from external files.
For use on pages repeating elements(headers, page numbers, current date) the system provides a mechanism for background pages (Master page). When displayed, the main pages seem to be superimposed on the background one, as a result of which the desired effect is achieved. In Publisher, it's easy to not only move between the main and background pages, but also move any object between them.
Publisher provides an Office-like verification system spelling, automatic transfers and thesaurus support, an improved Word document import wizard. Using it, you can easily create a publication in Publisher format from a Word document, while maintaining the formatting and embedded graphics of the original. At the same time, it is not a problem to apply internal Publisher settings to the entire imported document: general publishing settings, font and color schemes.
In addition to those mentioned, the program also includes other functions borrowed from Office: preview of a publication before printing, a document recovery function after a failure and background saving, an improved hint system and simplified access to product updates through the developer's website.
Selecting a document template
When launched, Microsoft Publisher Catalog automatically starts, offering a choice of more than 2 thousand publication templates. The kit includes templates for brochures and websites, press releases, business cards, etc. The user just needs to select the appropriate template.
A special Quick Publications Wizard gives users the ability to set various design parameters for a one-page document, greatly reducing the time it takes to create it.
The program saves the user's time by creating his personal profile when creating the first publication, containing his name, address, telephone and fax numbers. This information is then used in subsequent documents when working with Publisher.
Working in a familiar MS Office environment
Publisher's interface follows the same style as other MS Office applications, including various menus, icons, and links. To provide stylistic consistency across documents, many of the design templates in Publisher are available in other Office applications—Word, FrontPage, and PowerPoint.
All OfficeArt tools are used, including transparency and volume effects.
Toolbars and menus are configured in the same way as in other programs in the Microsoft Office XP suite.
Typical tasks
Publication formatting task areas.
In task areas New publication And Publishing setup design templates, color schemes, font schemes, and other markup tools are compiled into a set that appears next to the publication. When you select an option in the task pane, the publication updates immediately.
To open the main page, do the following.
On the menu View select team Home page.
Switch between main page and foreground
On the menu View select team Home page. To return to the foreground, select the command again Home page, thus removing the checkbox next to it.
How to hide the home page background for one page
- Go to the page where you want to hide text or pictures placed in the background. On the menu View select team Ignore Home Page.
Troubleshooting master pages
1. A double-page spread is no longer necessary.
On the menu Location select team Marking guides.
Uncheck Create two backgrounds with mirrored guides.
All pages in your publication will now use the right-hand background.
2. An object located on the main page does not appear on all pages of the publication
It may be that an object located in the background is hidden by some object located in the foreground. If this object is not important, make it transparent.
Select an object.
Press CONTROL+T.
3. Changes made on the main page are not reflected on all pages of the publication
Perhaps the publication uses a spread like a book. This means that it provides backgrounds for pages located on both the left and right sides. You may need to make changes to the backgrounds of both views.
Go to the page of the publication where the changes did not appear.
On the menu View select team Home page.
Make the necessary changes.
Text frames
The Microsoft Publisher application allows you not only to enter text, but also to set its placement on the page. To do this, simply create a text frame, enter text into it, and then, if necessary, move the frame or resize it.
If text doesn't fit in the text frame, Publisher can automatically fit it by reducing the font size. To continue the text elsewhere in the publication, the frames are linked together.
Text in linked frames flows from one field to another. For the convenience of the reader, pointers to the following section may be added. A chain of related frames is called an article.
Create a text frame
On the toolbar Objects click the button Inscription or Vertical inscription.
In your publication, position the pointer where you want one of the corners of the text to be, and drag diagonally until you have a text frame of the desired size.
Set of personal data
The personal data set contains data about the user, his job and his organization. This information can be saved when you create a publication so that you do not have to enter it each time.
Microsoft Publisher provides four sets of personal data:
main place of work;
additional place of work;
another organization;
home and family.
Each new post uses a default set of personal data. However, a user can apply a different set of personal information to a post.
Each set of personal data contains eight components:
position;
name of the organization;
additional information;
telephone number, fax number, email address;
emblem;
color scheme.
After you install Publisher, the Personal Information Set components contain default information. The data in the component can be changed.
Any individual component can be included multiple times in a publication, but each component can only contain one type of data. For example, you can include an organization's name on the front and back of a postcard, but you cannot include both the organization's name and its address in the same component. Any data must be contained in its own component.
If a user changes information in a personal data component, all components of the specified type in the current publication will be updated. For example, if you change the name, all components of that type in the publication will also change.
Adding a Personal Data Component to a Post
On the menu Insert select team Personal data. Then select the desired component.
If necessary, change the data, move the component, or resize it.
Add or remove a color scheme from a personal data set
Add a color scheme to a personal data set
On the menu Edit select team Personal data.
In the field, select the set of personal data that you want to edit. In field Color schemes click the checkbox Enable color scheme. To select a color scheme for your print or web publication, click the arrow in the box For printed publications or For publications on the web, and then choose a color scheme. Click the button Update.
Notes
- The color scheme you select will be applied to the current post and all future posts associated with that personal data set. After pressing the button UpdateUpdate
Removing a color scheme from a personal data set
On the menu Edit select team Personal data. In field Select a set of personal data to edit specify the set of personal data that you want to change. In field Color schemes click the checkbox Enable color scheme. Click the button Update.
Notes
- The color scheme is removed from the personal data set, but not from the publication. To change the color scheme, select from the menu Format team Color schemes. After pressing the button Update all personal information in the publication will be updated to reflect the specified set. If you change personal data directly in the publication and then click the button Update, the changed personal data in the publication will be restored.
Changing the publication size
On the menu File select team Page settings. Click tab Marking. Perform one of the following actions:
On the list Publication type select the desired type of publication and click the button OK.
On the list Publication type select Other size, enter the required values in the fields Height And Width and press the button OK.
Practical tasks:
1. In order to begin creating a publication, you must decide on the topic of the publication, guided by the instructions of the teacher.
3. Using the instructions for creating publications (in the theoretical part) using the wizard, you need to create a new publication .
4. For example, the topic of our publication is “Seasons”. When creating, we will use the publication design layout Leaves.

6. Place your mouse pointer in the main page edit field.
7. In the View menu, make the Home menu active.
8. Set the page background Image fill is arbitrary, for this in the menu Format select team Background.
9. After this, return to the menu View, uncheck the box Home page.
10. Place the mouse pointer in the text frame field to edit the caption, delete the contents. Enter text. Similarly, change the text of the caption under the picture.
12. As you complete the publication, do not forget to constantly save the document.
13. End of class.
Additional task
Add a personal information component to the post you create.
Change the post size setting. Page width 25cm, height – 21cm, orientation – landscape. How will the appearance of the home page change?
Control questions
List the main ways to create publications
What extension do files created in MS Publisher have?
What is the home page?
How to switch between main page and foreground?
How to create a text frame?
How many sets of personal data are provided in MS Publisher?
Does each set of personal data contain …….. components?
What components? Transfer.
How do I add personal information to a post?
How can I change the publication size?
Microsoft Publisher 2003
Publisher 2003 window on screen
Launch Publisher 2003. Start - All Programs - Microsoft Office - Microsoft Office Publisher 2003. Publisher has already launched and the program window appears on the Windows desktop. The picture shows what this window looks like.
Create a new publication
The result of using any Office 2003 program is a certain file created in this program, in Excel - a workbook, in PowerPoint - a presentation, in Access - a database, and in Publisher - publication . To start working on a new publication, you first need to create some initial version of it.
Ways to create a new publication
When launched, a task pane appears in the Publisher 2003 window. New publication where you can choose how to create a new publication: using layout or based on an existing publication.
Create a publication using a pre-made layout
As for using the layout, in the specified task pane, in the list Start with a layout, four categories of layouts are listed:
Print publications
Web sites and email
Layout sets
Blank Posts
Print publications
Web sites and email
Here you can find many layouts that are designed for quickly creating Web pages and special e-mail messages (advertising letters, for example) - publications that are supposed to be viewed from a computer screen.
Layout sets
Each such set allows you to create a family of publications that have a similar appearance. Each set uses the same set of design elements and colors that appear in all publications in the set. For example, a company wants to have business cards, branded envelopes, and a catalog that all look consistent.
Each set includes publication layouts for print, web and email.
Blank Posts
Another possibility is to create a new publication from scratch. To do this, click on categories Blank Posts in the task area New publication As a result, a list of blank publication layouts will be displayed below, from which you can select a specific type of publication - Business Card, Postcard or Poster, for example. Among the blank publication layouts, there are layouts for print, Web, and email.
Create a new publication based on an existing one
This method allows you to take advantage of design elements available in an existing publication, which only needs to be transformed as necessary - replacing text and images. To use this method, click on the link From an existing publication in the task area New publication. As a result, a window will open in which you can specify the file of an existing publication.
Practical work No. 1
Create a publication
Goals: learn
Launch Microsoft Publisher 2003;
Navigate through the publication;
Select publication layouts;
Change the color scheme of the publication; change the background of the publication;
Insert drawings and objects into the publication; work with objects (move, copy, group, resize) publications;
Change the font scheme of the publication;
Create various types of publications;
Add and change personal data in created publications;
Format pages;
Selecting a Layout
A simple method for creating a new post that provides maximum assistance to the user is to use the layout contained in one of the categories. These categories can be accessed from the task pane New publication, which is displayed when Publisher starts and which can be opened at any time (by selecting File - New).

1. Task Areas New Listed Post - Start with Layout Select a category Publications for print.
As a result, a list of corresponding subcategories will open. If you now select one of the subcategories from this list, samples of the corresponding layouts will appear in the Publisher workspace.
Inserting a picture.
1. From the Insert menu, select the command Drawing – Pictures. A collection of clips will appear in the task area; if no pictures appear, then you need to click the button Begin. Select the third landscape, double-click on the picture, and the picture will appear in your publication.
2. Delete the old (standard) picture, select it by clicking on it with the mouse, a frame with circles at the corners will appear around the picture. Press a key on your keyboard Delete.
3. Give your drawing the desired size by stretching it using the size markers (circles) in the corners.
Enter your post text
Placeholders in post layouts. Depending on the type of post you're creating, it may contain a variety of space fillers for text or graphic elements. Working with placeholders is extremely easy. For example, if you click on a placeholder text fragment, a text cursor will appear in it. After this, nothing prevents you from entering the desired text in place of the placeholder.
When you click in the title or text area, the standard text is highlighted and can be replaced with any other text.
1. Enter Heading publications - Announcement
2. Type Text publications – Sanatorium "Sibir" offers a comfortable holiday for the whole family on the lake.
Selecting page orientation
Depending on the type of publication you are creating, the task pane Options may also provide the ability to change the orientation of publication pages.
In cases where it is not possible to change the orientation of publication pages in the task pane Options, you can do this on the tab Marking dialog box Page settings(File - Page Setup).
Creating a business card
One of the options when creating a publication is that you can change the layout of the publication during the process if the selected layout is not suitable. To select a new layout, click on the link Post Layouts- top in the task area Options. After that, depending on the subcategory of the publication you are creating (for example, Business Cards), samples of its layouts will be displayed in the Settings task area, any of which can be selected (by clicking) for the publication you are creating.
 On the left in the task pane that opens, select the command Create a publication. Start with a Layout Print publications– Business Cards. You will be offered 53 business card layouts, from which you can choose the layout that suits your style best. To select, click on the layout with the left mouse button.
Working with objects
 When you place an element (text, graphics, or otherwise) on a publication page, you are effectively inserting an object surrounded by a frame with markers. Knowing how to insert, delete, or move such objects, as well as define their border attributes and colors, will allow you to give the pages of your publications the desired look.
The most obvious way to insert an object into a post is to use the toolbar Objects, located at the left edge of the Publisher 2003 window (see figure).
1. Click on the button of one of the tools on the toolbar Objects.
For example, Inscription or Drawing.
2. Place your mouse pointer at the location on the page where you want to insert the new object.
In this case, the pointer will take the form of a crosshair.
3. Click the mouse button and drag diagonally to create a frame for the future object.
4. When the frame reaches the desired size, release the mouse button.
After creating an object frame, you need to add the appropriate content to it. How this is done for graphic objects. Regarding the object Inscription, then when you create it, a text cursor appears inside it, after which all that remains is to enter the desired text.
After creating an object in this way, you can resize its frame, move it or delete it, or group it with other objects on this page. All these manipulations with the object are discussed below.
As for deleting an object, this is the simplest task. Just select the object (so that a frame with markers appears around it), and then use the
Resizing an object
After creating an object, click on it so that a frame with resizing handles appears around the object. You can then change the width or height of the object's border (or both) on the publishing page.
The green marker at the top of the object is used to rotate it around its axis. To do this, place the pointer on the marker and perform a rotational movement with the mouse.
Moving an object
To do this, click on the object to select it, then place the mouse pointer anywhere on the border of the frame until it appears as a crosshair with arrows, and drag.
In this case, the moving dotted frame indicates the place on the publication page that the moving object will occupy if you release the mouse button at the moment.
Copying an object
You can also copy an object from a publication into RAM, and then place any number of copies of it on the same or different pages of the publication (or even in a completely different publication).
1. Click on an object to select it.
2. Select a team Edit - Copy(or click on the button Copy on the panel Standard
As a result, the object is copied into the computer's RAM.
3. Display the page on which you want to place a copy of the object.
4. Select a team Edit - Paste(or click on the button Insert on the panel Standard, or use the keyboard shortcut
After this, a copy of the object will be pasted onto the selected page.
Grouping objects
After placing objects on the page, it may be necessary to change the position of all objects relative to the bottom or top edge of the page or, for example, a heading. Moving each object individually is too much of a hassle, especially if you've already spent a lot of time placing objects together. The solution to the problem is to group such objects and move them as a single unit.
1. Select the first object in the group by clicking on it.
A frame with markers will appear around the object.
2. Press and hold the key
A frame with markers will appear around each such object, and a button will appear at the bottom of the page Group objects
3. Place the mouse pointer on any border of any group object.
The pointer will take the form of a crosshair with arrows.
4. Perform drag and drop.
 In this case, moving dotted frames indicate the place on the publication page that each of the group objects will occupy.
Objects grouped in the manner described above will cease to exist as a single whole if: you click. If you want to group the selected objects on a more permanent basis, click the button Group objects. As a result, a common frame with markers will appear around the selected objects, and instead of the button mentioned above, a button will appear Ungroup objects, which (if you click on it) will again turn the group into unrelated objects.
Text formatting
Text here refers to the content of text objects on publication pages. To format text means to apply a different font, font size, style, or color. All this can be done by selecting the desired text, and then using the panel tools
Post formatting
Working with graphics
This involves creating and manipulating graphical objects on publication pages. Creating objects was discussed in detail in the "Inserting an Object" section. After creating an object, the task is to add some graphic content to it. To do this, select the command Insert - Drawing, and then in the submenu that appears - one of the commands contained here.
The commands of this submenu are used to insert graphic objects belonging to various types onto publication pages. Similar commands (Pictures, From File, From Scanner or Camera, AutoShapes and WordArt Object) are also available in other programs.
In addition to inserting pre-made images, a Publisher user can create images on publication pages themselves from scratch. To do this, you can use the toolbar Objects, allowing you to draw various lines, ovals and arrows.
Changing fields
When creating a new publication (especially from scratch), you may need to change the margins of its pages. Publisher provides the ability to move margin lines in a dialog box Marking guides.
1. Select a menu command Location - Marking guides.
As a result, a dialog box of the same name will open.

2. Go to the tab Margin Guides(unless it's in the foreground).
3. In a group Margin Guides Click the up and down arrow buttons on the left, right, top, and bottom counters to increase or decrease the size of the corresponding fields.
This will cause the margin lines on the page image in the Preview area to move accordingly.
4. Click OK for the new field values to take effect.
Adding borders
You can place borders along the edges of publication pages (to decorate them). When you create a publication using a layout (or set of layouts), borders may be part of the selected layout. However, if you want to apply borders to pages in a publication you're creating from scratch, or to new pages you've added to a publication, you can use the task pane to do so. Post Layouts.
Create more print publications using content layouts. For an organization you have invented or for your family, a group of friends, a group you study in, college...
Bulletins
Information signs
Catalogs
Envelopes
Menu
Stickers
ads
Postcards
Posters
Gift certificates
Certificates of honor
Post cards
Invitations
Programs
Saving a Post
To do this, just click on the button Save on the panel Standard(or use the File - Save command).
In order to assign a name different from the standard one when saving a publication, select the command File - Save As. After this, a dialog box will open Save as, in which you can specify the folder and file name.
Closing a publication
After completing work on it and saving, close the program. To do this, just select the command File - Close, if you forgot to save, a corresponding reminder message will appear in which you can click on the appropriate button (Yes or No).
Practical work No. 2
Creating a Web Publication
Goals:
Determine the purpose of creating a Web site and its content;
Determine the logical and physical structure of the website and create a plan diagram;
Explore Publisher 2003 tools;
Create your own website;
Learn to format text and page objects;
Learn how to change Web page parameters and preview a Web site;
Insert graphic objects;
Launch Publisher 2003. In the task pane Create a publication– Let’s start with the layout – Web sites and email. By left-clicking, select the website layout you like best.

A dialog box will appear on the screen User-friendly website builder in which you can already determine the structure and purpose of creating your website
When creating Web sites, several types of structures are used: sequential or branched (hierarchical)
 When using a sequential structure, elements are arranged in a logical chain. Such a sequence usually has a clearly defined beginning and end, and starting to get acquainted with it from one of the intermediate elements, as a rule, does not make sense. This structure is well suited for material such as book chapters, sections of a virtual excursion or trip, or chains of test tasks. A hierarchical structure implies that each of its elements (except for the first) is a subsection of an element of a higher level. Such a structure has a clearly defined beginning (“the root of the tree”), but has no end. It provides the ability to move from level to level, as well as move horizontally.
Thus, before you start creating a Web page for a site, you need to think carefully about the material, choose the organizational structure of the site as a whole, and think over a system of transitions between pages (navigation system).
Creating hyperlinks
HYPERLINK is an HTML instruction included in the code of a Web page. This instruction causes the browser to open another page or navigate to another part of the document after the user clicks on the corresponding text or graphic image.
When the user places the mouse pointer on a hyperlink, it takes the form of a pointing hand. This form of pointer tells the user that the object (graphic image or text) located below it is a hyperlink.
1. Select with the mouse the necessary text information, which will serve as a hyperlink.
2. In the menu Insert select team Hyperlink. A dialog box will open Adding a hyperlink.
 3. In the area Link to: select team Place in the document. The structure of your document will open, where you can select the page you need.
4. Click the button OK. Deselect your text information by clicking on any empty space on the page. Notice that the text information is now underlined and displayed in the color set for hyperlinks in the Page Options - this means that it is now hyperlink .
1. Select with the mouse the picture that will serve as a hyperlink.
2. In the menu Insert select team Hyperlink.
3. In the list of pages, select the page to which the hyperlink is being made.
4. Click the button OK.
Formatting objects
Formatting the Logo
On the Home page, select the logo, right-click to open the context menu and select the command Master for this object. On the left in the task pane you will see a list of layouts that you can apply to this object.

Microsoft Publisher 2003
(examples of practical work on studying the program)
Microsoft Office Publisher 2003
Microsoft Office Publisher 2003 is more diverse than Microsoft Office Word 2003 in terms of working with objects and columns of text. Publisher also includes templates for creating every type of printed product imaginable, from business cards to catalogs.
- In contact with 0
- Google+ 0
- OK 0
- Facebook 0