Do I need Windows 10 Defender or should I turn it off? Is Windows 10 Defender enough to be completely safe?
Windows 10 Defender is optional. You will not receive complete protection, but even something that is not at all harmful to your system can be blocked.
As soon as you install the antivirus, Windows 10 Defender will immediately turn off completely forever, or rather until you remove the antivirus - they are not compatible.
At first, after installing or reinstalling Windows 10, of course you don’t have an antivirus, and the defender is turned on by default.
The first thing you do is start installing various applications and drivers. This is usually what almost all PC owners do.
They may pose absolutely no threat to your computer or laptop, just not have signing certificates.
Very often the defender simply blocks them and the only way to continue the installation is to turn it off.
How to stop windows 10 defender
To disable it and go to the “windows defender” section. You will see a window like in the picture.
We are interested in the parameters line - click on it. If you have an antivirus installed, then instead of the option to disable you will receive a message that the application is disabled.
If there is no antivirus, you will see the line “Real-time protection” and you can disable it for a while.
I repeat - “for a while”, because after a few minutes it will turn on again on its own, but during this time you will be able to complete the work that it blocked.
If this turn of affairs does not suit you, then there are two ways to completely disable it forever - through the registry and group policy.
Completely disabling Windows 10 Defender via Group Policy
Write the word in the search or utility: gpedit.msc. If, then the application will appear at the very top, if then it will launch immediately after clicking “OK”.
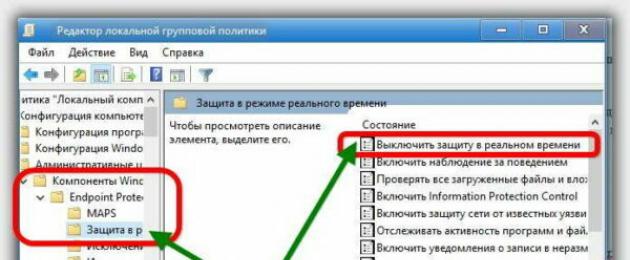
In it you need to follow the path: “computer configuration” -> “administrative templates” -> “windows components” -> “windows defender or defender”.
ATTENTION: if you have the final version installed, then instead of what is described above, having reached the components... section, look for the line - “EndpointProtection” and after opening this folder the “real-time protection” section.
Now on the right side, click (double) on the line “turn off real-time protection” (some may have a different name - Turn off Windows Defender).
 Next, set the “black dot” to “enabled”, click “apply”, “OK” and exit the editor - the defender will be disabled forever.

Disabling Windows 10 Defender Permanently via the Registry
You can permanently remove the defender service through the registry. To do this, in the run utility or in the search, enter the word: regedit and run it.
After that, find the registry key:
HKEY LOCAL MACHINE\ SOFTWARE\ Policies\ Microsoft\ Windows Defender
You need to create another DWORD parameter in it. Call it DisableAntiSpyware. If there already is one, then do not create another one, but just give it the value 1.
Although it is written above that the described procedures will disable Windows 10 protection completely and forever, this is a little wrong, because if you return the changes made back, you will get the parameters as they were - that is, if you want to turn them back on.
I always completely disable it forever, but if you don’t use an antivirus, then it’s better to have it turned on - you’ll still get some protection from external intrusions. Good luck.
Windows Defender is Microsoft's own antivirus, which began to be built into all versions of operating systems starting from 8. The standard protection system works in such a way that, if you do not install a third-party antivirus product, it monitors security. But as soon as you download and install another antivirus, the Microsoft tool will turn off automatically and give way to the new program. Windows Defender used to be criticized, but after the 2016 update it was seriously improved and began to receive more and more positive reviews. Be that as it may, the choice of antivirus is your purely personal matter, so in this article we will take a detailed look at the topic of how to disable Windows 10 Defender permanently or temporarily.
We will talk not only about how to neutralize a standard antivirus, but also give several ways to do this. Naturally, we will also show you how to disable the program for a while so that you can restore the protection later. This may be needed, for example, when installing a game with a crack. We have noticed a situation where Windows Defender tells us that the application is disabled and does not want to work. We will also analyze this problem.
After the August 2016 update, the antivirus icon began to appear in the taskbar. The icon can be removed, but the defender himself will continue to work quietly. To do this we do the following:
- Open the task manager (right click on an empty space on the taskbar).

- The task manager itself will open. We need to go to the “Startup” section and right-click on the “Windows Defender notification icon” entry, and select “Disable” in the menu that appears.


After this, the icon will disappear from the taskbar and will no longer be displayed. You must restart your computer for the changes to take effect.
You can disable any antivirus, like Windows Defender, only temporarily or for the purpose of replacement. There are situations when we want to install a useful program, but for some reason it is perceived as a virus. It is then that you need to force the defender to change his mind. But in such a situation, the correct thing to do would not be to deactivate the antivirus, but to add the program to the “white list”. We will describe how this is done a little below.
Another option that requires disabling Windows Defender is to replace it with another antivirus that you download from the network yourself. Microsoft has provided for the situation of replacing the security software with a third-party one, and when installing another antivirus, the defender is automatically disabled. Sometimes this does not work and then you have to disable the program manually.
Disable correctly
Let's start disabling Windows Defender. Before doing this, please read the previous section carefully. Deactivating a standard antivirus without installing a new one can lead to the loss of personal data or system crash.
Checking antivirus activity
- Initially, you need to open the control panel, namely the Security Center section. The easiest way to do this is to search for “tens”. Click on the magnifying glass on the taskbar and enter the word “defender” there, and then select the result we need from the search results.


- If you see a window in which the defender notifies us that the PC is completely secure, then it is active and we can proceed to disable it. If, on the contrary, no action is required, then the antivirus is already disabled.


Disable using the program interface
This is the first, easiest and safest way to disable the standard antivirus. If this option does not work for some reason, you can move on to more complex and effective solutions, we will describe them below, but for now we will proceed to disabling Windows 10 Defender through its software interface.
- Open the defender itself (we described how to do this in the previous section). You can also run Microsoft's antivirus through the system tray. To do this, simply double-click on the program icon.


- In the window that opens, click on the gear icon - these are the program settings that we need.


- In the settings window, select the “Virus and threat protection settings” section.


- Disable the triggers indicated in the screenshot.


The protection will be deactivated, but after a few minutes it will turn on again. This option is suitable only for those users who need to stop the antivirus for a short time. For others, there are more effective instructions.
Disabling antivirus using Group Policy Editor
You can completely disable Windows 10 Defender using a standard tool - the Local Group Policy Editor. First, let's launch it. This can be done through the Run program. Use the keyboard shortcut Win+R.
- Open the utility and enter the command “gpedit.msc” into the text field without quotes and click “OK”.


- Open the path indicated in the screenshot in the left pane of the editor and select the “Turn off Windows Defender Antivirus” key on the right side of it.

- Double-clicking the left mouse button on the selected item will open a new window in which we can disable the defender. Place the checkbox indicator in the “Disabled” position and click “OK”.

After the system restarts, Windows Defender will be disabled.
The Group Policy Editor does not work in Windows 10 Home - in it the operation will have to be performed through the registry.
Disabling via Registry Editor
Let's consider another method that will allow us to deactivate the standard antivirus service. To do this, we need a registry editor, which is present in all versions of Windows.
- Launch the Run utility using the Win+R hotkeys. Next, enter the command “regedit” without quotes and click “OK”.


- The Registry Editor will open: we need to follow the path indicated in the screenshot.


- Now you need to create a new key in the right pane of the editor. To do this, right-click on an empty space and select “New” – “DWORD Value (32 bits).

- Enter the name of the new key “DisableAntiSpyware” and press “Enter”.


- Double-click to launch the created entry and set the value to “1”. This will disable Windows Defender. If necessary, it can be activated again by setting the key value to “0”.


Attention! If you already had a key named “DisableAntiSpyware”, just set the value to “1” - you don’t need to create anything.
Ready. The system will notify you that Windows Defender is disabled. The notification area icon will disappear only after you restart the computer.
We use third-party software
If for some reason it was not possible to disable your native antivirus, you can resort to another method - third-party programs. There is a huge amount of similar software, but it is better to use a utility we have tested called Win Updates Disabler. In one of the articles we talked about, this program was also used there. You can download the application a little lower, but for now let's figure out how to work with it.
- Open the program that you have already installed by this time, and check the box next to “Disable Windows Defender” (other items should not be checked).


The program will notify us that the changes made have been applied and in order for them to take effect, you need to restart the computer. We agree and click “OK”.


You can also use another, more functional program, Destroy Windows 10 Spying or DWS, which you can also download on this page. The application was created to disable spyware functions in Windows, but it also has the function we need - deactivating the defender. Let's look at how this is done.
- Download the program and run it (no installation required). Go to the “Settings” tab, check the box next to “Enable Professional Mode” and “Disable Windows Defender”.

- Now you need to apply the changes. Go to the “Home” section and click on the button indicated in the screenshot.


- After pressing the key, Windows Defender will turn off and we will be prompted to restart the PC. We do this by first saving all the data and closing the programs.


Attention! When working with DWS, not only the standard antivirus is disabled. Please take a look at the screenshot before applying the changes.


Using PowerShell
There is another way to deactivate the built-in defender. To do this, you will need to launch the Command Prompt or PowerShell. The choice of environment depends only on you, but in both cases the tool must be called exclusively as an administrator. Let's get started.
- Let's use the search in the taskbar again. Click on the magnifying glass icon, enter the phrase “PowerShell” in the search field and right-click on the result, selecting “Run as administrator”.


- When the shell opens, paste the command “Set-MpPreference -DisableRealtimeMonitoring $true” into it without the quotes and press Enter. The system will think for a moment and go back to standby mode. This indicates the success of the operation. All that remains is to close the window and reboot the system.

The same can be done through the command line. Don't forget to run it as administrator.
Disable unprotected notification
The protection is disabled, but now another problem has appeared: constant notifications that our computer is no longer protected and is at risk. This is for security purposes, but if you disable your antivirus deliberately, you should know what you are doing.

Let's turn off notifications that only interfere with your work.
- Using the standard Windows 10 search tool, we find and open the Security Center.

- As you can see, the standard antivirus is already disabled.

- Click on the gear icon and go to Windows Security Center settings.

- Switch the trigger and turn off notifications - it's simple. You can also remove messages from the firewall right away.


Adding an app to Windows 10 Defender whitelist
There is no need to disable your antivirus. You can simply add the program that he “scolds” to the so-called trusted zone or white list. We will consider an example of adding a file or folder to trusted ones using the example of Windows 10 Pro 64 bit Defender. Let's get started.
- We open our antivirus by clicking on its icon in the system tray (the program can also be launched through the search, using the method described above). Click on the gear icon and go to the program settings.


- Click on “Virus and threat protection settings.”


- Scroll the window to the “Add or remove exceptions” item and click on it.


- Click on the inscription “Add exception” and in the drop-down menu select the object that interests us.

The following options are available:
- file. Allows you to add a specific file in a single quantity, for example, .exe;
- folder. Allows you to add an entire directory to exceptions. It may be necessary when there are too many objects and adding them one by one is inconvenient;
- file type. Adds a file extension and excludes all objects with that extension from the scanning area;
- process. You can enter the name of a process that you don't want the defender to pay attention to.
Let's add to quarantine using a directory as an example. Click on the plus sign and select “Folder”. In the window that opens, left-click on the desired directory and press the “Select folder” button.

The folder has been added to antivirus exclusions. Now it will not scan it and look for viruses. From here you can delete the object and force the program to scan it again.


Let's sum it up
Many users ask the question: how to remove Windows Defender? This cannot be done, but we have learned how to disable it in several ways at once. It is important to understand the danger that our computer is exposed to without antivirus software installed on it. You need to deactivate protection only for the purpose of replacing it as quickly as possible or for a short-term installation session of a program that the defender perceives as a virus.
Video about disabling Windows 10 Defender
Microsoft has integrated Windows Defender antivirus into its OS for a reason: this tool protects the system from malware from the moment it is first launched. Therefore, Defender is a useful feature that most users need.
If you prefer a third-party one, then “Defender” may conflict with it. Usually the built-in antivirus is disabled after installing a new one, but sometimes this does not happen and the protection tools begin to interfere with each other: they slow down the system or see unwanted software in each other.
In such cases, you can disable Windows Defender and rely entirely on a third-party antivirus.
How to disable Defender in Windows 10 and 8
1. Launch Windows Registry Editor. To do this, press the Win + R keys and enter the command in the “Run” window regedit and press Enter.

If a parameter named DisableAntiSpyware is not displayed for you, create it yourself: right-click on an empty area of the window, select “New” → “DWORD Value (32 bits)” and give it an appropriate name.

Then double click on it, change the value to 1 and click OK.
4. Restart your computer. After this, the Defender should turn off.
To enable it, open the registry editor again and change the DisableAntiSpyware value to 0.
How to disable Defender in Windows 8, 7, Vista and XP
1. Launch the manager. To do this, use the key combination Win + R, enter in the “Run” window services.msc and press Enter.
2. In the list that appears, find the service “Windows Defender” or a similar name and double-click on it.

3. When a new window opens, in the “Startup type” field, select “Disabled” and click OK.

4. Restart your computer for the changes to take effect.
To enable protection, find Windows Defender in the service manager again and change the startup type to Automatic.
How to quickly disable Defender in any version of Windows
If for some reason you are unable to disable Defender using standard means, try the free Win Updates Disabler program. It is compatible with all versions and allows you to disable protection in two clicks.
After launching the utility, check the “Turn off Windows Defender” option and click “Apply now”. After this, restart your computer to apply the changes you made.

To enable protection, launch Win Updates Disabler, go to the “Enable” tab, check “Turn on Windows Defender” and click “Apply now”.
Question from a user
Hello.
Help disable Windows Defender. I'm trying to install one game, but it blocks it. I have already checked the game using Dr.Web CureIt! - no viruses were found, everything is fine with her.
PS I didn’t turn on the defender, didn’t download it, didn’t install it. He appeared out of nowhere...
Hello.
By default, Windows 8 and 10 come with Defender pre-installed (Microsoft considers it necessary for the OS to have some basic protection against spyware, adware, viruses and other “good stuff”). Therefore, after installing (or updating) the Windows 10 system, you will have Defender (its English name) installed and running by default.
And, for example, I support Microsoft in this regard! The only thing I can’t understand is why it’s impossible to build in a normal disabling of this defender, so that you just need to press one button in the menu (and not climb through the registries, entering various keys...). Rhetorical question...
And so, to the heart of the matter.
Warning! Although many people criticize the defender, it nevertheless provides basic PC protection against viruses and other malware. And if it works for something, it is possible that by turning it off, you can catch a virus. Be careful and additionally check the files with third-party antivirus utilities.
Via control panel (temporarily)
The first and easiest way is to use the Windows Control Panel. However, I will immediately note that such a disconnection is temporary character and after rebooting the device, the defender will be in operation again. Convenient in cases where you want to install or do something that is blocked by the defender.
1) And so, first open the START menu/settings.

- or a “switch” for on/off will be immediately visible. defender;
- or there will be a link to the Defender Security Center (this is in newer versions of the OS). I will consider just this option (screen below).

Next, you need to open the “Protection against viruses and threats” section (pay attention to the icon itself, because sections are not always signed). In this section, you need to open the link "Protection settings against viruses and other threats."

Actually, now you can disable real-time virus protection, disable cloud protection, etc.

Through the Group Policy Editor (permanently)
In order to permanently disable the defender, you must use either the registry or the Group Policy Editor. It is easier and faster to do this through the Group Policy Editor, but it is not available in every version of Windows (for example, it is not available in the home version).
If the editor does not open for you, you can use the following method, or upgrade your Windows OS to the Pro version.
And this is how to open the Group Policy Editor:
- press a combination of buttons Win+R(note: the "Run" window should appear);
- enter the command gpedit.msc and press Enter.

In the editor, open the section (in the menu on the left): "Local Computer -> Computer Configuration -> Administrative Templates -> Windows Components -> Windows Defender Antivirus" .

Local Group Policy Editor (clickable)
In the parameter, move the slider to "Enabled" mode and save the settings.

Turn off the defender through the Group Policy Editor (clickable)
Thus, the defender itself will be turned off after restarting the computer! However, there is something else...
We have not disabled various options for monitoring the system, scanning downloaded data, etc. All this also needs to be disabled. This is done in the same section, full address: "Local Computer -> Computer Configuration -> Administrative Templates -> Windows Components -> Windows Defender Antivirus -> Real-time Protection" .
There are several parameters in this subsection that need to be set to "disabled" (as in the example below):
- enable behavioral observation;
- check all downloaded files and attachments;
- monitor the activity of programs and files on the computer;
- enable process scanning if real-time protection is enabled.

Disable real-time checking (clickable)
Via the system registry (forever)
The system registry causes some discomfort for many novice users. In fact, the Registry Editor is no different (in appearance) from a regular Explorer: sections (folders) are displayed on the left, and parameters on the right. Both can be edited, created, deleted just like regular files.
So, first you need to open registry editor. You can do it like this:
- press a combination of buttons Win+R ;
- enter the command regedit, click OK.
To help! 5 ways to open registry editor(on any Windows!), even if it's locked -
- open section Computer\HKEY_LOCAL_MACHINE\SOFTWARE\Policies\Microsoft\Windows Defender
- create a string in it DisableAntiSpyware
- open it and give it the value "1" (without quotes). The end result should look exactly like the screenshot below. I've highlighted everything you need!


Pay attention to the parameter when creating it. Requires DWORD (32 bits)!
After that, you need to create a section Real-Time Protection(i.e. folder) in the Windows Defender section (folder), and in it create:
- DWORD value (32 bits) named DisableBehaviorMonitoring
- DWORD value (32 bits) named DisableOnAccessProtection and assign it the value "1";
- DWORD value (32 bits) named DisableScanOnRealtimeEnable and assign it the value "1";
- DWORD value (32 bits) named DisableIOAVProtection and assign it the value "1". An example of what should happen is presented below.

Actually, this is how you can simply (difficultly?) disable the defender. By the way, after making changes to the registry, do not forget to restart your computer.
Also, the defender is automatically disabled when installing most modern antiviruses (however, I emphasize that not all!). Why is there more than one way for you? And disabling a modern antivirus for a while is not a problem, see the example in the screenshot below from Avast.

Additions are welcome.
The latest versions of operating systems in the form of "eight" and "ten", in addition to the huge number of innovations presented, are also distinguished by the fact that they have a built-in active system protection service - the so-called Windows Defender (not to be confused with a firewall). By and large, it is not particularly needed, especially when the user uses other tools like antiviruses. However, not everyone knows how to permanently disable 10, for example, so that it does not cause problems in operation. There are several basic methods that will now be discussed.
How in the completely simplest way?
Not all people who use the tenth version of Windows in their daily work know about such a service. In the absence of antivirus software, its messages may appear, say, during the installation of certain programs, blocking the execution of the process. However, if you understand how to disable Windows 10 Defender permanently, you can use the simplest solution.
It consists, as you might have guessed, in the installation of any anti-virus package. Naturally, this disabling will only work until the antivirus is removed from the computer. That is, if the user is going to use such protection constantly and not uninstall such a package, we can talk about disabling the defender, although in this case, this concept is very conditional. Nevertheless, it will work as an option.

Even when entering the “Control Panel” through the standard “Start” menu or using the control command in the “Run” menu bar (Win + R), when you try to access the “Windows Defender” section, the system will simply display a message stating that this service is disabled and does not watch the computer.
Login via the options menu
In principle, you can disable this service when entering the corresponding section through the update and security menu, called up from the settings settings (again, if there is no antivirus).

Here you need to turn the sliders off in the real-time protection and automatic sample sending line. True, the question of how to turn off Windows 10 Defender permanently is not resolved in this way. The service will automatically activate after approximately 15 minutes. But if antivirus software is installed, the fields to disable it will be inactive. This method is suitable, for example, when installing some program, nothing more.
Disabling Defender via Group Policy Editor
But now let’s move on to solving the problem of how to permanently disable Windows 10 Defender. To do this, one of the most effective ways can be used, accessed by the gpedit.msc command, entered into the “Run” menu.

Here you need to go down the parameter tree in the computer configuration and find the desired section. Depending on the version of the “ten” itself, this can be either Windows Defender for the initial version, or Endpoint Protection for the final version. How to permanently disable Windows 10 Defender in this case? Yes, just set the service status to Turn Off in the right window. After this, you don’t even need to reboot the system. The service will be deactivated once and for all.
How to disable defender permanently: registry
Another method is to use Although, by and large, it duplicates group policies (or vice versa), it is still the most effective. Please note that if the disabling has already been done in the Group Policy Editor, you will not be able to make any changes in the registry.

However, let's see how to permanently disable Windows 10 Defender through the system registry. Here, in the HKLM branch in the Software section, go to the policies section, and then in the Microsoft directory find the Windows Defender we need. Now in its settings you should create a DWORD parameter, name it DisableAntiSpyware (if it does not exist) and assign it the value “1”. If the specified parameter is available, we simply change the value from 0 to 1, that’s all.
Additional programs
If you don’t want to do such things, you can use special programs like Win Updates Disabler. Such utilities have special tabs where the names of components that can be deactivated are indicated.

We find the corresponding service in the list of disableable elements, simply put a checkmark next to it and apply the changes made. And, naturally, this program was given only as the simplest example, but today on the Internet you can find not even dozens, but hundreds of such utilities. However, all of them are initially very similar in their functionality. The only difference is in the interface and the names of modules or tabs. But the main services of the system are called the same everywhere. So there shouldn’t be any particular difficulties using them.
Conclusion
In principle, as is already clear, the issue of complete shutdown is resolved quite simply. True, it is best to deactivate this service either through group policies or through the system registry. Naturally, if the user does not intend to remove the antivirus. This will be the simplest way. On the other hand, if you use special utilities, do not forget that they will constantly monitor the system in terms of its disabled components in the background, often using unreasonably high RAM consumption and placing additional load on the central processor. However, with sufficiently large amounts of RAM, this will not be noticeable.
Yes, and one more thing: if the antivirus software is removed from the computer for some reason, and the defender was previously disabled manually using the two above methods, it is better to activate it again, since without this the system will be at risk. And so - at least some, but still protection.
However, it is up to everyone to decide for themselves which method of disabling or enabling protection to use, what means to ensure security to use. But the fact that it is impossible to leave the system without protection, even the most primitive one, is not even discussed. Therefore, before deciding to disable it, think a hundred times.
- In contact with 0
- Google+ 0
- OK 0
- Facebook 0