iPhoto has been a staple photo tool on the Mac for 13 years. However, in the last few years it has been actively criticized for significantly lagging behind the development of the operating system of which it is a part. Too slow, with an outdated interface and insufficient functionality, over time iPhoto began to look like Apple's least loved child. Many Mac owners have studiously avoided having to reboot this dinosaur, but with the release of OS X Yosemite, there's a great excuse to send the photo app in for a major overhaul.
Announced back at WWDC 14, the Photos app was supposed to arrive in early 2015, and Apple has kept its promise. In the first build of OS X Yosemite OS X 10.10.3 for developers, the disgraced iPhoto icon disappeared, and in its place a minimalistic colorful circle with the caption “Photo” appeared. Many reputable publications have already tried the new product and were very pleased with the changes, so at iGuides we decided to prepare our own review of the application and talk about its features, advantages and disadvantages.

First of all, it’s worth recalling the background to the appearance of the Photos application. Apple decided to use it to kill two birds with one stone: the outdated iPhoto and the professional Aperture. Instead of developing two products in parallel for different target audiences, it was decided to focus on one application that is as universal as possible. Looking ahead a little, I would like to say that everything turned out great with the “home” application, the professional product was irrevocably killed. Adobe, with its Lightroom, very correctly began to lure away former Aperture users, since there are no other options for the latter. You cannot cross iMovie and Final Cut, or GarageBand and Logic Pro, leaving the simplicity of the first products and the limitless professional capabilities of the second.
Photos app for Mac. Beginning of work

Photos for Mac is currently only available as part of testing the OS X 10.10.3 update. Immediately after launch, you are prompted to synchronize your iPhoto or Aperture library and get started. Importing photos is fast, but the speed depends on the number of photos stored on your computer.

Currently, iPhoto remains in the Applications folder, but once you start using Photos, you'll see a warning at startup that your library has already been moved. Most likely, after the release of the general Yosemite update, the iPhoto application will disappear from the operating system.

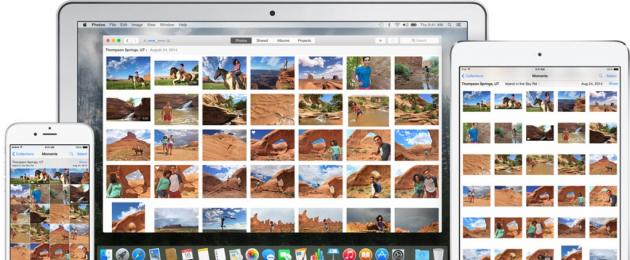
The first thing that attracts attention is the modern interface, reminiscent of the mobile version and the speed of the Photo application. Even on the relatively fresh MacBook Pro 13 from mid-2013, I was not eager to use iPhoto again, but now the Photos application risks becoming the main tool for storing and organizing a photo library on a computer. Even with tens of thousands of photos, the performance of the new application remains very high.
Photos app for Mac. Interface

As I said, the look and feel of Photos for Mac is very similar to the mobile version of the app. Of course, it was created taking into account the features of desktop interfaces, but the similarities are still obvious. There are four main tabs: Photos, General, Albums and Projects.

The first tab contains all the pictures that are in the library. By analogy with the mobile version, you can change the display scale, down to tiny thumbnails, when hundreds and even thousands of pictures appear on the screen at the same time. The “General” section contains albums that the user has decided to share with other people. If you enable the appropriate option, photos and videos added by other participants, as well as comments, will be collected there.

The third tab is Albums. It contains both automatically created folders and custom ones. For example, Albums contain your favorite photos, photo stream, and face recognition. The final section of the Photo application Projects is reserved for creating and printing albums with pictures. In Russia this function still does not work.
Photos app for Mac. iCloud Sync

Thanks to the iCloud Drive cloud service, Photos are closely connected to mobile devices. Currently, there are two tabs in the application settings: main and iCloud. The second allows you to enable the iCloud Photo Library function to automatically upload and store pictures in the cloud, as well as synchronize between all devices within the same Apple ID account. In other words, once you take a photo on your iPhone, it will immediately appear on your iPad and Mac. The same is true in other combinations - wherever a new image appears, it will be automatically added to other devices.

Users can choose to store original photos and videos on their computer and access them offline, or use optimized storage. The second will be useful to owners of computers with small-capacity storage devices, since they allow you to store photos and videos in the cloud with their original resolution, and download them to your computer only if there is enough free space. In addition, in iCloud settings you can enable the My Photo Stream option, which stores only recent photos without using up space in iCloud Drive, and there is also iCloud Photo Sharing for sharing certain albums with other users.
Photos app for Mac. Editing photos

In addition to organizing your media library, the Photos app has tools for editing photos. In the processing mode, a dark color scheme is automatically turned on, as if emphasizing the transition from storing and organizing a media library to more interesting and serious capabilities of the application. There are six main tools and categories: Enhance, Rotate, Crop, Filters, Correction and Retouch.

The most useless tools, in my opinion, are Enhancement and Retouching. The first, in automatic mode, tries to make the photo more impressive by changing the brightness, contrast, saturation and white balance settings. In practice, the result is almost invisible and is much inferior to the automatic image enhancement of popular graphic editors, for example, Pixelmator. The retouching didn't impress me either. Its operation is similar to the Repair Tool in other image applications and is supposed to remove unwanted objects and minor imperfections in a photo by analyzing neighboring pixels. In practice, the result leaves much to be desired, since the source of the “healing” pixels is not always determined correctly, but if this can be solved by manual selection, then the problem with frequent blurriness of the retouched area is more difficult to overcome.

The Rotate, Crop, and Filters tools should already be familiar to users of the Photos mobile app. The first allows you to rotate pictures around its axis, the second is responsible for arbitrary cropping, selection of popular proportions, as well as automatic cropping in accordance with the rule of thirds. In addition, in the “Crop” mode, you can straighten a littered horizon. The filters are also no different from mobile ones; a set of eight pieces is unlikely to be enough for most users.

Of greatest interest is the set of tools under the general name “Correction”. By and large, these are settings that will be useful for advanced beginners and hobbyists interested in something more than one-button photography. Theoretically, they should instill a love for color correction and other image manipulations in order to eventually transfer users to more serious applications (read Adobe Lightroom). The available options can be added or removed depending on your preferences, and they are divided into three categories: Basic, More and Advanced. The name is not very informative, but in the first public version of the Photo application there are localization flaws every now and then, which will probably be corrected for release. Some menu items can also be renamed.

So, in the Correction mode, color adjustments are available, including exposure, saturation, sharpness, noise reduction, white balance, levels, desaturation and histogram viewing. This set will be enough for most users for home use and selective processing of the best photos. It’s convenient that you can display only the necessary tools on the toolbar, thereby simplifying the application interface. There is a theory that in the future the Photos application may have plugins to expand functionality and add professional photo processing capabilities, but there are serious doubts that Apple will allow third-party developers to invade its product by changing its functions.
Working with iPhoto.
Advisory text
iPhoto is a beautifully designed, simple, yet functional application for organizing, storing, viewing and editing photos and videos. iPhoto allows you to store video captured on a digital camera or mobile phone in your library, although, unlike photos, it cannot be edited (for this there is iMovie, included in iLife’09).
iPhoto's interface is as simple and elegant as anything, with a nice gray color scheme with nice icons and will be completely intuitive for people familiar with Mac OS X.
As you can see in the screenshot, the appearance of the iPhoto workspace is quite laconic. On the left is the Media Library, where all the content contained in the library is presented, sorted into the appropriate folders, at the bottom of the media library is the Information field, which displays information about the currently selected object. On the right side of the window is a field for viewing the contents of the media library, at the bottom of which is a quick access menu bar that dynamically changes depending on the currently displayed content.
iPhoto stores all content, both photos and videos, in a library, which is a clearly structured catalog. When viewed in the Finder, the library appears as a single file, but in practice it is a directory, as you can easily verify by right-clicking on it and selecting Show Package Contents from the context menu.
 iPhoto settings are simple and fairly obvious:

General settings

Decor

Events

General access


Additionally

As you can see from the screenshots presented, the settings are not complicated and are unlikely to cause any difficulties for iPhoto users. Perhaps, only the Sharing and Web items require additional explanation. The first allows you to set parameters for searching photos in shared folders on your local network. In the absence of one, you should not pay attention to this point. The Web tab is of interest only to users of the MobileMe service and gives its subscribers the opportunity to publish their pictures. There are several ways to import images into your iPhoto library:
1. In the main menu, select the Import item, in the window that opens, select one or more images and press the OK button, after which the selected images will appear in the library and will be presented as an Event (An Event is one of the ways to organize a media library).
2. Using drag&drop, drag one or more images onto the iPhoto icon in the Dock or onto the iPhoto work area. The pictures will be imported and combined into an event.
3. If, while traveling across the Internet, you see a photo or other image that you would like to add to your collection, then simply right-click on it in the browser and select Add to iPhoto Library, after which the image will be added as a separate events.
Organizing a media library
After importing images, a reasonable question arises: how to systematize them so that everything is convenient for you? iPhoto offers several options:
· Automatic division into events. An event is, essentially, a kind of folder into which images are stored, combined according to some characteristic. Automatically, iPhoto categorizes your library into events based on one of two criteria: date taken or date added to the library.
 From the screenshot you can see that in this case, events are divided by date.
How it looks in practice: by choosing automatic division by shooting date, you have as many events as there were dates on which you shot (information is taken from EXIF). That is, if you took one photo every day for a year, you will get 365 events as a result. If you chose the second option - division by date added to the library, then there will be exactly as many events as the number of times you added photos. By double-clicking on an event, you can see everything that is inside.
· Manual division into events - suppose you imported your collection of photos and iPhoto automatically divided them into events during import according to one of the options described above, but for some reason this result does not suit you and you want to make adjustments. In this case, it is possible to select one event (or several, in this case you need to hold down the cmd key to select) and, using drag&drop, move it (or them) to another event. In this case, the events are combined. You can also change the name of the event, for which you simply double-click on the old name and when it is highlighted for editing, simply enter your own.
· Albums - along with events - are another way to give your media library a harmonious look. Albums appear on the left side of the iPhoto work window as folders. You come up with names for them yourself, based on your own criteria for assessing what will be in the album. Otherwise, all the actions that were described regarding the events are also valid for the albums. That is, they can be combined, renamed, deleted, etc.
· Smart albums are a convenient way to catalog according to a specific feature. Nothing is physically stored in smart albums, there are only shortcuts to pictures. You can select what will be displayed in the smart album according to many criteria, such as: date of shooting, faces, places, keywords, rating, name of the album or event, time interval... As you can see from the above, iPhoto provides a lot of storage options and organizing photo collections.
I tried the app for a few hours on my iPad 2 and iPhone 4S (with iOS 5.1 of course, since that's the system requirement), and in my opinion, it's a very powerful app. As I'll demonstrate next, Apple has been able to port many of its advanced photo editing capabilities and advanced technologies to the mobile version of iPhoto, making it almost higher iPhoto for Mac allows you to edit, quickly adjust, and interact with your photos. Once mastered, the new gestures and commands can be quite powerful, although learning how to use a new interface is not easy. I also think iPhoto for iOS suffers from a serious file management problem - the best example of this is the lack of a centralized file system for apps to easily communicate with each other and share files and modifications to them.
I'd like to get this out of the way before I get to the (very) good part. If you were hoping Apple had come up with an easy way to import photos without duplicates and manual controls, I'm sorry, but you'll be disappointed with the app. iPhoto for iOS is another standalone app that simply can't "sync" changes you make to a photo.
I say "simple" because iPhoto for iOS doesn't use the photo upload system that iPhoto for Mac does. Since every iOS device comes with a system-wide "Camera Roll" directory that other apps can access, Apple developers had to make sure that iPhoto had access to this location - and this is where I started to run into problems.
First, let's familiarize ourselves with some basic terminology:
- iPhoto for iOS is an app.
- Photos.app is another app from Apple that comes pre-installed on every device.
- Camera Roll is a system function.
- System-wide albums.
- System-wide events.
- If you import photos using the Camera Connection Kit, you will find "Last Import" and "All Imported" in iPhoto and Photos.app.
When you first launch iPhoto for iOS, the app will update your photo library, and this will happen very frequently as you add new photos to the Camera Roll (like screenshots). This can be quite annoying if you're reviewing iPhoto, but I think regular users will rarely pay attention to such "issues". In any case, as you can see from the screenshots, the main window of iPhoto for iPad contains all your albums in the form of a shelf, and at the top there is a panel for switching between sections. However, this Albums tab contains not only albums created in Photos.apr (they are presented in the form of a gray book), but also Photo Stream, Camera Roll, Last Imported, All Imported (blue books), Edited and Favorites (brown books). Brown albums are specific to iPhoto only.
When I started using iPhoto for iOS, I moved some photos to other albums. During the test, I noticed several details:
- Edited photos are not automatically saved to an album or Camera Roll.
- The Everything Imported album displays different thumbnails in iPhoto and Photos.app (at least on my device).
For the iPhoto test, I imported a few photos using the Camera Connection Kit, saved a few from Photo Stream to the Camera Roll, and selected a few existing ones from the Camera Roll. After a few minutes of exploring the interface and editing with various functions, I returned to the main screen of the program in the hope of seeing that all my changes were automatically saved to the system Camera Roll album. My reasoning was that if iPhoto for iOS, unlike the Mac version, can import photos from a central location (Camera Roll), then the changes will also be automatically synchronized. Not so fast. It turns out that the Camera Roll is not centralized at all, and every photo change made in iPhoto is exported to the Camera Roll as a new file. Even better, if you're editing something in iPhoto from the Camera Roll "album", further editing the same file from the system Camera Roll in Photos.app will cause iOS to fail to inform the changes, and you will end up with two different files in one Camera Roll.
From this point of view, some of you may disagree with me that such file management is built into the design of iOS. Of course, I can recognize that Apple's sandbox architecture improves security, but at the same time limits applications in terms of synchronization between each other (and the system. However, here I see how two applications access resources from the same system function (Camera Roll) can't sync the changes you make. As I said, I ended up with a different file in Camera Roll.
Another counterargument would be that iPhoto is a standalone photo editing app sold on the App Store and does not replace the changes Photos.app makes to Camera Roll. Looking at the problem from this perspective, we can call Photos.app a more "priority" application for saving changes - for example, even with my "miscellaneous files" problem, third party applications integrated with Camera Roll identify the file from Photos.app, and not from iPhoto. So I can agree that iPhoto for iOS was created as a photo editing tool on top of Photos.app and the system's Camera Roll - a tool that saves its duplicates. But I disagree that not being able to import a new edited version of a photo after making changes in iPhoto and Photos.app is a good sign. Actually, I think this is a bug and should be fixed.
- An edited photo from Camera Roll displays an "edit" icon in Camera Roll in the Edited album in iPhoto. Camera Roll in Photos doesn't have this.
- Saving a photo to Camera Roll from iPhoto creates a new file.
- Try this: edit the file in iPhoto, don't export. Open the same photo in Photos and edit it. Launch iPhoto again. iPhoto doesn't show the changes you just made in the system's Camera Roll, but instead shows the old "edited" version. I think there is a bug at this stage, because the Cancel button leads to the deletion of the photo. The new modified version from Photos.app appears here, but cannot be imported into iPhoto.
That's the point. iPhoto is a new application, and it is common for it to have bugs. I hope this issue of editing one file in two applications will be fixed soon, because it can really confuse the user. However, the main “problem” remains the same - the iPhoto program is not a full-fledged replacement for the standard Photos.app application and cannot become one, contrary to many expectations. With that in mind, I can say that the rest of the app is very interesting and works just fine in some areas.
Various metaphors are widely used in interface elements. Libraries are made up of glass shelves, albums are presented in book form, photographs are arranged against a linen background, and brushes look like real brushes, with effects organized in a rotating menu/palette. Don't forget that the horizon cropping and straightening tool interface is also presented in the form of a rotating disk.
While interfaces are a matter of taste, I found it interesting in iPhoto for iOS that almost every feature can be accessed in two ways: gestures or sliders. To crop, you can make the familiar pinch & pan gesture, to adjust highlights/shadows and exposure, you can use the slider at the bottom or hold a touch on the screen, then slide your finger across the screen and manually select the intensity of the adjustment. To adjust saturation, skin tone, blue sky and greens, you can do the same thing, just in a different tab. Some settings like white balance (there are 9 options) and the aforementioned effects are only available through the interface, but I think it's important to note the role gestures play in the app. They become like hotkeys, like on a computer.
Personally, I didn't really like the pop-up images of brushes and effects (screenshot below) - not only because my tastes differ from Apple, but also because these elements feel like they slow down the interface, especially on the iPad 2. Or, again However, these could be bugs from the first version of iPhoto - it’s quite possible, although I think the animation in general (opening/closing the brushes panel, turning pages) could be faster. However, I really liked two things - hints, which can be called up at any time using the button, and sound effects (they can be turned off in the settings). I don't like some aspects of the iPhoto interface on the iPhone, which is designed to be "simpler" than its iPad sibling.
I think Apple could do a better job with iPhoto's navigation system. Especially on the iPad, I think the app should take a simpler approach to the photo selection process - instead of moving the sidebar to the center (which can be quite confusing), it would be better to take a page from Photos.app's book with a simple grid → full-screen process. Basically, the Photos view (which contains photos from all albums except Photo Stream) has a grid interface, but iPhoto's Camera Roll does not. When you open the Camera Roll album (where you'll most often be importing photos from for editing), the app will switch to a split interface with a side (landscape mode) and bottom (portrait mode) panel where photo thumbnails will be displayed. In landscape mode, the sidebar can be resized to display only one column of thumbnails. If you enlarge it, you will be able to view three columns at once. The same applies to portrait mode, only horizontally. Additionally, in the sidebar (I'm guessing you'll use iPhoto more often in landscape mode) there's a pop-up window to show All Photos, Starred Photos, Edited Photos, Hidden Photos, or All and Hidden Photos. (Photos can be hidden using the X button in Edit mode.) One last thing: the sidebar can be moved to both sides of the screen by dragging it by the header.
Thumbnails in the sidebar can be used. A simple tap lets you preview a photo, a double tap lets the app automatically select multiple photos (and it works pretty accurately), and a delayed tap on a thumbnail adds it as a highlight to the main panel.
This is the most confusing part of iPhoto, and one that many bloggers criticize the app for. It's not clear whether the sidebar can be moved, and it's not clear what all these . Clicking the grid button in the top toolbar shows and hides the sidebar, but you can also do the same with a bezel gesture from the edge of the screen. However, try adding several photos to the selection: the main panel will also become a grid, the selections are somewhat unclear, and tapping on the selection in the main panel will open the photo not in full screen, but above the grid. I think it all works together in a confusing way. There is no “clear all” button; a simple tap does not remove the selection. If you double-tap and hold (yes, you heard that right), you'll have the Loupe tool open in the preview section. In my opinion, you now understand how easy Photos.app is to use compared to the stunning iPhoto.
Ultimately, iPhoto for iOS isn't as bad as you might think. The app is powerful, yet designed for mobile devices (don't forget the iPhone), and costs $4.99. The effects are pretty good, the sharing capabilities are decent, and the Journals feature is one that users like my mom will love and geeks will ignore. The editing functionality in iPhoto works, and I'm not going to write something like "Apple is a disappointment" because this is only the first version of the application and it may have bugs. There's no doubt that iPhoto is an impressive piece of engineering, maybe a little less so in terms of design, but that's personal preference. However, there are issues here that need to be mentioned and limitations of the app (and iOS in general) that Apple will have to address. If we have one Camera Roll directory, why can't Apple allow two apps to treat it as one directory? If Apple made both apps, why can't they make the overall design and navigation elements without using different sidebars and grids that can confuse the user? Why can't Apple be consistent in its use of tap, tap, and delay button labels?
There are a few things iPhoto could do better. iPhoto is a powerful app, again, it even works on your phone, but there shouldn't be any duplicates in the Camera Roll. The editing engine is good, the application contains a huge number of functions. I can't wait to try it on the new iPad with Retina display.
via by Federico Viticci
Nowadays, you won’t surprise anyone with digital photographs. Photos accumulate and the question arises of how to properly store them, quickly find them and conveniently view them. Because I prefer Apple products, so the choice was between Aperture and iPhoto. Both of these programs have the necessary functionality: creating albums, faces, GPS coordinates, search, image editing. In addition, they interact perfectly with Apple devices, which is not surprising. In the end I settled on iPhoto, because... it is simpler and included in the basic software package that comes with the Macbook, while Aperture is a paid option.
The main sections in iPhoto are Events, Photos, Faces, Places and Synchronization with various web services. Next, about everything in order
Events
Let me start with the fact that all pictures imported into iPhoto are divided into events. They can be sorted by title, date, or manually. I try to choose bright previews, and make the title short and “telling”. If the event is periodic, then I add some kind of numeric identifier, for example NG - 2009 or My DR. 25 years.
When you hover the cursor over an event from below, we see the time range in which the shooting was carried out and the number of shots. If you move the cursor horizontally, you can familiarize yourself with the contents.
In the properties of the event, we can mark the geographic location on the map, or it will appear on its own if coordinates were attached to the images. In the Description I put the dates of the event itself + its type. In this case
Badminton when searching, it will show me pictures of all tournaments related to this sport.
The content of events can be viewed by double-clicking on the preview, or by going to the photos section, where all events will appear in expanded form.
Photos
If, during import, the pictures are divided into several catalogs, for example from Masha, from Petya, from Vasya, then I mix them into one. For me it makes no difference who did the shooting. Therefore, the next step, in order to achieve chronological consistency, is to check the date of the photographs, or try to set it close enough to the true one. This will give us an adequate picture of what is happening when sorted by date, and will also arrange all events in the sequence in which they took place. At the same time as this process, I discard garbage and keep only the best ones from almost identical photographs.
The next stage is color correction, cropping images and leveling the horizon.
Now, let's move on to the faces. iPhoto finds them on its own, but sometimes it can make mistakes. In such cases, the face can be designated manually. If the bearer of the face is in the address book, then the pictures are linked to the contact. Gradually, iPhoto learns and begins to recognize people, but it may unlearn if the faces are of poor quality and small, or the photo is taken in profile. I noticed that the program does not identify people wearing sunglasses well.
Then I put points on the map. Unfortunately, in landscape mode the map is not very detailed, but by entering the exact address in major cities, the location will be determined correctly. The map will only be visible if you have Internet access.
I give almost every photograph a title using the following scheme: Place. Event name. A comment. This is quite convenient if pictures are posted online. Perhaps someone will be interested in such a parameter as date.
In the case of photographing any museum exhibits with an attached description, I put the text of the description in the appropriate area.
And the last two parameters that can be assigned to pictures are tags and ratings. I haven’t found a use for it myself, but I believe that tags are convenient to use to identify the author of a photo, and the rating will be useful for those who like to send the same pictures to different resources. Let's give the best photos 5 stars and start posting them on all social networks.
Persons
This is where all the people who were tagged in the photographs are located. The names either correspond to the address book or to the name that you specify yourself.
Having opened the faces of a certain person, you can choose two viewing modes: the faces themselves (as in the preview), or a mode where the entire photo in which this face is marked is shown.
Information about this person contains his name, the time range in which pictures with his participation were taken, the number of pictures and e-mail if he is in the linked contact. It is this, as I understand it, that is the key parameter when identifying a user on Facebook, but more on that later.
Places
This is where it’s good to study the history of the world in photographs.
First, you can boast to your friends about your wide geographical coverage, which, judging by the labels, is clearly not for me yet.
But then take a good look at the points.
Album and Smart Album
There is a separate category that is not visible in my screenshots, because... I didn’t have time to fully use it. I'll tell you a little about her.
Album essentially similar to something with Event, but serves somewhat different purposes. You can collect any pictures you want into it. Let's say I would like to have an album with all the sunset photos. In addition, albums can be arranged in a tree-like directory system.
Smart Albums are designed to select pictures based on the following possible criteria: album, any text, description, date, event, person, file name, keyword, my rating, location, photo, name, aperture, camera model, flash, ISO focal length and shutter speed.
Synchronization with various web services
By default, iPhoto uploads pictures to 3 services: Flickr, Facebook and MobileMe. I don’t use MobileMe because it’s paid, but I’ll try to tell you a little about the others.
All pictures are posted in one touch and there is no point in describing this process. However, I note that the information is synchronized, so at any time you can correct the signature, tag a person, or perform any other action.
Consider the display of photographs taken at the Nuclear Energy Museum.
Facebook synced the title and tagged me in the photo. At the same time, I found my account using an e-mail taken from the MacOS address book. This way you can already tag all your Facebook friends in iPhoto.
Flickr synchronizes the title of the image and its description.
Problems and their solutions
For those who would like to use iPhoto, it is better to start reading the article from this section.
Any change to the photo, be it color correction, flipping, or cropping, leads to iPhoto creating a duplicate. Thus, there is always a chance to roll back to the original photo. But a huge disadvantage is that such a backup eats up a lot of hard disk space, and the program does not have the function of making a modified image a new original. To solve this problem, the following method was invented:
All original images are stored in /%Macintosh HD/%Username/Pictures/iPhoto Library/Originals/
And the modified images are in /%Macintosh HD/%Username/Pictures/iPhoto Library/Modified/
Now let’s replace the pictures in the Originals catalog with pictures of the same name from the Modified Images catalog.
Then in iPhoto, select the pictures and press function Return to original. Thus, the modified image becomes original.
But all the troubles don't end there. In all photographs that were flipped, cropped or tilted, the coordinates of the faces will be reset, and the faces will have to be marked again. Therefore, this operation must be carried out immediately after the transformation, and only then only mark the face in photographs.
If you see that something is wrong with the thumbnails, then you need to restart iPhoto in a different mode:
Hold down the Option and Command keys and click the iPhoto icon (keep holding the Option and Command keys). Next, select the required items and wait for the process to complete
Alternative software
- In contact with 0
- Google+ 0
- OK 0
- Facebook 0